

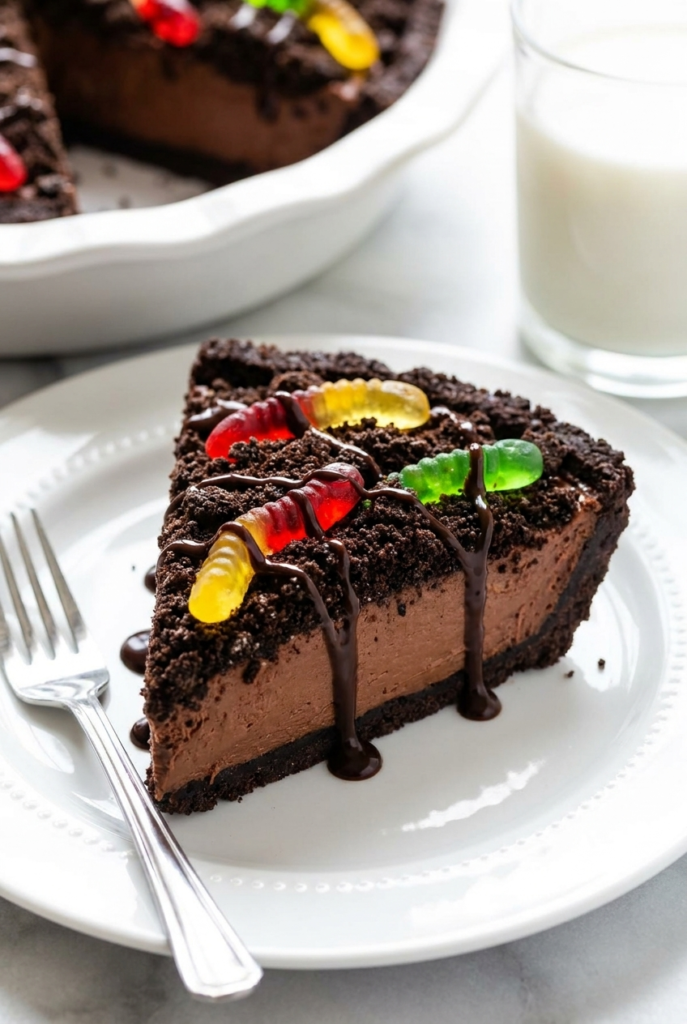
Ultimate No-Bake Dirt Pie Recipe, Easy Oreo Chocolate Dessert
This dessert has serious “disappears straight from the fridge at midnight” energy. One slice turns into two very quickly. Suddenly someone is standing in the kitchen eating Dirt Pie directly from the pan with a tiny spoon and absolutely no regrets. A beautiful tradition honestly.
The best part is how ridiculously easy it is. No baking, no complicated steps, no stress. Just crushed Oreos, creamy chocolate filling, fluffy whipped topping, and enough gummy worms to make the whole thing look delightfully chaotic. Childhood nostalgia doing what it does best.
❤️ Why You’ll Love This Recipe
- No-Bake Bliss – Absolutely zero oven time required, making it the perfect dessert for hot summer days or when you just need something simple and fast.
- Ready in a Flash – With less than 30 minutes of active prep time, this decadent pie comes together incredibly quickly. The hardest part is waiting for it to chill!
- Kid-Approved Fun – This is a fantastic recipe to get little helpers involved in the kitchen. They’ll have a blast crushing cookies and decorating with gummy worms.
- Perfect for Parties – It’s a certified crowd-pleaser that can be made a day in advance, saving you precious time and stress on party day.
🛠 Tools You’ll Need
- 9-inch Pie Pan 🥧
- Food Processor 🌪️
- Electric Hand or Stand Mixer ⚡
- Large Mixing Bowl
- Medium Microwave-Safe Bowl
- Spatula
🥄 Key Ingredients
For the Oreo Crust:
- Chocolate Sandwich Cookies (27 cookies) – The star of the show! Regular Oreos (not Double Stuf) create the perfect cookie-to-cream ratio for a sturdy, flavorful crust. 🍪
- Salted Butter (1/4 cup) – Acts as the delicious glue that holds our cookie crumbs together. The hint of salt balances the sweetness perfectly. 🧈
For the Chocolate Cream Filling:
- Milk & Semi-Sweet Chocolate Chips (1 cup each) – Using a blend of two chocolates creates a deep, complex flavor that’s not overly sweet. Pure chocolate heaven! 🍫
- Heavy Cream (1/2 cup) – This is essential for creating a rich, smooth, and stable ganache base for our filling. Don’t substitute with milk! 🥛
- Cream Cheese (8 oz) – Provides a tangy, cheesecake-like base that makes the filling incredibly creamy and lush. Make sure it’s softened for a lump-free texture. 🧀
- Whipped Topping (8 oz) – Gives the filling its light, airy, mousse-like consistency. It’s the secret to that dreamy texture! ☁️
🍳 How to Make Dirt Pie
- Create the Cookie Crust: In a food processor, pulse the chocolate sandwich cookies until they become fine crumbs. Pour in the melted butter and pulse again until the mixture resembles damp soil. 🌱
- Press the Crust: Tip the buttery crumbs into a 9-inch pie pan. Use the back of a spoon or a flat-bottomed glass to press the mixture firmly and evenly across the bottom and up the sides of the pan.
- Chill the Crust: Pop the crust into the refrigerator for at least 15 minutes to firm up while you prepare the filling. This step is key to preventing a crumbly base! 🥶
- Melt the Chocolate: In a microwave-safe bowl, combine both types of chocolate chips and the heavy cream. Microwave for 30 seconds, then stir well. Continue heating in 15-second bursts, stirring in between, until the chocolate is completely melted and smooth. Set aside to cool for a few minutes.
- Whip the Cream Cheese: In a large bowl, use an electric mixer to beat the softened cream cheese until it’s light and fluffy, with no lumps. ✨
- Combine Filling Ingredients: Gradually pour the slightly cooled chocolate mixture into the whipped cream cheese, beating on low speed until just combined. Be careful not to overmix.
- Fold in the Fluff: Gently fold in the whipped topping with a spatula until no white streaks remain. The key is to be gentle to keep the filling light and airy!
- Assemble the Pie: Spoon the glorious chocolate filling into your chilled cookie crust and spread it into an even layer.
- Chill to Set: Cover the pie with plastic wrap and refrigerate for at least 1-2 hours, or until the filling is firm to the touch.
- Decorate and Serve: Just before serving, sprinkle the top with extra crushed cookies for “dirt” and arrange your gummy worms on top. Dig in and enjoy! 🐛
💡 Tips for Success
- Soften the Cream Cheese – Let your cream cheese sit at room temperature for about an hour. This is the #1 secret to a perfectly smooth, lump-free filling.
- Don’t Scorch the Chocolate – Microwave the chocolate and cream in short intervals and stir frequently. Overheated chocolate can become grainy or seize up.
- Fold, Don’t Stir! – When adding the whipped topping, use a gentle folding motion with a spatula. This keeps the air in the mixture, resulting in a light, mousse-like texture.
- Chill Thoroughly – Don’t rush the chilling time! The pie needs at least 1-2 hours for the filling to set properly for clean, beautiful slices.
🆘 Troubleshooting Guide
- Problem: My crust is too crumbly and falls apart.
Likely Cause: The crumbs might not have been fine enough, or there wasn’t enough butter to bind them.
Solution: Ensure you pulse the cookies to a fine, sand-like texture. If the mixture still seems dry, add another tablespoon of melted butter. Also, make sure to press it very firmly into the pan before chilling. - Problem: The chocolate filling is runny.
Likely Cause: The chocolate mixture was too warm when added, or the whipped topping was overmixed and deflated.
Solution: Let the melted chocolate cool to lukewarm before mixing it with the cream cheese. Always fold the whipped topping in gently. If it’s still soft, give it more time in the fridge—up to 4 hours should firm it up completely. - Problem: My filling has lumps of cream cheese.
Likely Cause: The cream cheese was too cold when you started beating it.
Solution: Always start with room temperature, fully softened cream cheese. If you’re in a pinch, you can unwrap it and microwave it for 10-15 seconds to soften it quickly.
👩🍳 Pro Chef Tips
- Gourmet Chocolate: Elevate the flavor by using high-quality chocolate bars (like Ghirardelli or Lindt) instead of chips. Finely chop them before melting with the cream.
- Homemade Whipped Cream: For a less sweet, richer flavor, substitute the whipped topping with homemade stabilized whipped cream. Beat 1.5 cups of heavy cream with 1/2 cup of powdered sugar and 1 tsp of vanilla until stiff peaks form.
- Flavor Twists: Add a teaspoon of espresso powder to the melting chocolate to intensify the flavor, or a splash of vanilla extract to the cream cheese for extra warmth.
☕ Perfect Pairings
- A tall glass of cold milk 🥛
- A scoop of vanilla bean ice cream 🍨
- A hot cup of coffee or an espresso ☕
- A drizzle of salted caramel sauce over each slice 😋
📦 How to Store
- Refrigerator: Tightly cover the pie with plastic wrap or store it in an airtight container. It will stay fresh and delicious in the fridge for up to 4 days.
- Freezer: For longer storage, wrap the pie securely in plastic wrap, then a layer of aluminum foil. It can be frozen for up to 1 month. Thaw overnight in the refrigerator before serving.

Get Recipes on Pinterest
📌 More Recipes You’ll Love
- 🎀 Soft Sour Cream Cookies with Pink Frosting
- 🍪 Ultra-Soft Cinnamon Cream Cheese Cookies
- 💚 Grinch Snowball Cookies – Buttery, Green & Full of Holiday Cheer!
- 🍋 Ooey Gooey Butter Cookies – The Softest Cookie You’ll Ever Taste
No-Bake Dirt Pie
Description
Dirt Pie is a whimsical, no-bake dessert that captures the playful joy of childhood in every spoonful. Its origins are rooted in the American Midwest, where similar layered "dirt cake" recipes became potluck staples in the 1980s. This pie version simplifies the concept into an easy-to-serve format, perfect for parties, family gatherings, or simply a fun weeknight treat.
Ingredients
Crust:

Chocolate Filling:
Toppings:
Instructions
-
Place the chocolate sandwich cookies and melted butter into a food processor. Pulse until the cookies turn into fine crumbs with a texture similar to damp sand.
-
Transfer the cookie mixture into a 9-inch pie pan. Use the back of a spoon or a flat measuring cup to firmly press the crumbs across the bottom and up the sides of the pan.
-
Place the crust in the refrigerator for at least 15 minutes while preparing the filling. This helps everything stay together instead of crumbling dramatically at first slice.
-
Add the milk chocolate chips, semi-sweet chocolate chips, and heavy cream to a microwave-safe bowl. Microwave for 30 seconds, then stir well.
-
Continue heating in 15-second intervals if needed, stirring between each round, until the chocolate is completely smooth and glossy. Let it cool for about 2 minutes.
-
In a large mixing bowl, beat the softened cream cheese until completely smooth and fluffy with no lumps remaining.
-
Gradually pour the slightly cooled chocolate mixture into the cream cheese while mixing on low speed until fully combined.
-
Gently fold the whipped topping into the chocolate mixture using a spatula. Do not aggressively stir or beat it. This keeps the filling light and mousse-like instead of dense and sad.
-
Spread the chocolate filling evenly into the chilled Oreo crust using a spatula.
-
Cover the pie and refrigerate for 1 to 2 hours, or until the filling feels firm and sliceable.
-
Right before serving, sprinkle crushed chocolate sandwich cookies over the top to create the “dirt” layer. Add gummy worms across the pie for the full nostalgic effect.
-
Slice and serve cold straight from the fridge. Bonus points if someone makes dramatic worm sound effects while bringing it to the table.
Note
🍪 Chocolate sandwich cookies: I usually use Oreos, but any similar brand like Twist and Shout works too. Just make sure to use the regular version, not Double Stuf.
🧈 Salted butter: Unsalted butter works fine as well. Just add a small pinch of salt.
🍫 Chocolate chips: Mix and match your favorite chocolate chips for extra flavor. Milk, dark, or semi-sweet all taste great here.
🥛 Heavy cream: Stick with heavy cream for a thick and creamy filling. Milk will make it much thinner.
🍦 Whipped topping: You can swap it with homemade whipped cream. Just fold it in gently so the filling stays light and fluffy.
📊 Nutrition values are estimates and may vary depending on the ingredients used.