

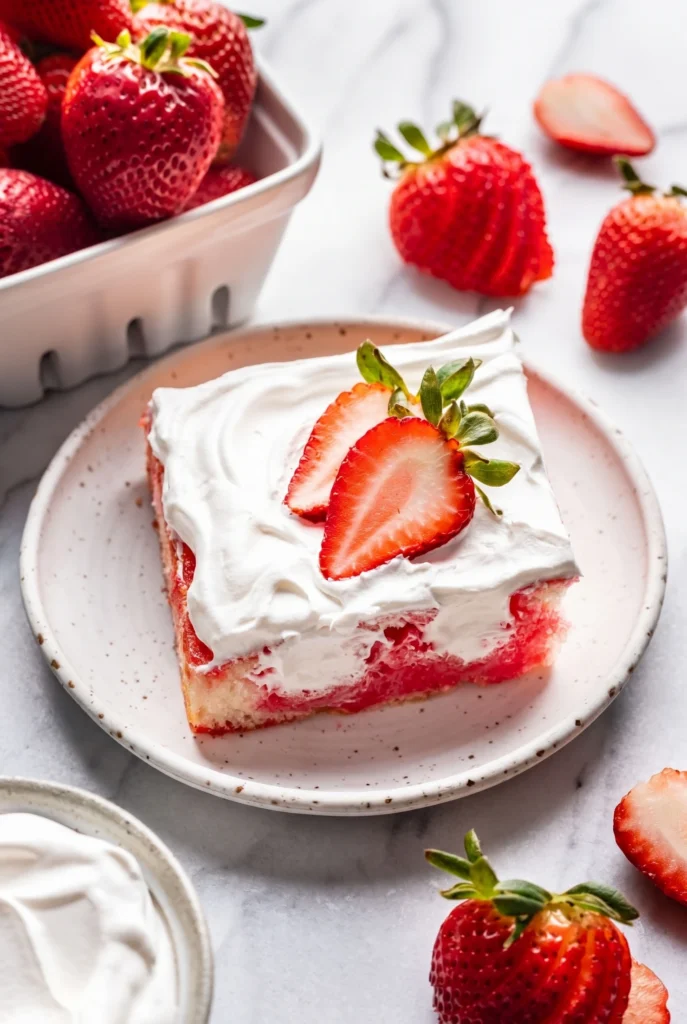
Easy Strawberry Jello Poke Cake, Classic Cool Whip Dessert
This cake has major retro potluck energy in the best possible way. Bright pink strawberry streaks, fluffy whipped topping, and somehow every slice tastes colder and better straight from the fridge at midnight. Dangerous little cake honestly.
The whole thing is wonderfully low effort too. Bake a cake, poke holes in it like a dessert detective, pour over the Jello, then let the refrigerator handle the rest. Tiny bit of patience, very big reward.

❤️ Why You’ll Love This Recipe
- Incredibly Easy – Uses a box cake mix for a foolproof, stress-free bake every single time.
- Crowd-Pleaser – The bright colors and light, refreshing taste make it a guaranteed hit with both kids and adults.
- Perfectly Make-Ahead – You can prep this cake a day in advance, making party planning a breeze.
- Endlessly Customizable – Easily swap the Jello and cake flavors to match any holiday, theme, or craving!
🛠 Tools You’ll Need
- 9×13 inch Baking Pan Metal pan is best for even baking.
- Mixing Bowls 🥣
- Whisk
- Wooden Skewer or the handle of a wooden spoon
- Offset Spatula For spreading the topping smoothly.
🥄 Key Ingredients
For the Cake & Filling:
- White Cake Mix (1 box, 15.25 oz) – The perfect blank canvas! It lets the vibrant Jello color and flavor shine through. Plus, all the ingredients needed to prepare it (eggs, oil, water). 🥚
- Strawberry Gelatin (1 box, 3 oz) – This is the magic ingredient! It infuses the cake with that classic sweet, fruity strawberry flavor and creates the beautiful ribbons of color. 🍓
- Boiling Water (1 cup) – Essential for properly dissolving the gelatin so it can soak into the cake perfectly. 🔥
For the Topping:
- Frozen Whipped Topping (8 oz) – Thawed Cool Whip or a similar brand provides a stable, creamy, and light topping that holds up beautifully in the fridge. ☁️
- Fresh Strawberries – The perfect fresh garnish to complement the Jello and add a pop of natural sweetness and color.
🍳 How to Make Strawberry Jello Poke Cake
- Bake the Cake: Prepare and bake the white cake mix in a 9×13 inch pan according to the package directions. Let it be your fluffy foundation! 🎂
- Get Pokin’: While the cake is still warm from the oven, use the handle of a wooden spoon or a thick skewer to poke holes all over the top, about an inch apart. Don’t be shy—these are the channels for all that yummy Jello!
- Cool Down: Allow the cake to cool completely on a wire rack. This is a crucial step to prevent the cake from becoming soggy.
- Prepare the Jello: In a separate bowl, whisk the strawberry gelatin powder with the boiling water until it’s completely dissolved. You should have a smooth, fragrant liquid. ✨
- Fill ‘er Up: Carefully and slowly pour the dissolved Jello mixture evenly over the top of the cooled cake, making sure it seeps into all the holes you created.
- Chill Out: Place the cake in the refrigerator and let it chill for at least 1 hour, or until the Jello is set. This is where the magic happens! ❄️
- Top & Decorate: Once the Jello is firm, spread the thawed whipped topping evenly over the entire cake. Garnish with fresh, sliced strawberries before serving. Enjoy the masterpiece!
💡 Tips for Success
- Poke Evenly – Distribute your holes evenly across the cake to ensure every slice gets a good amount of the Jello filling.
- Cool Completely – Don’t rush the cooling process. Pouring Jello on a hot cake can make it gummy. Patience is key!
- Thaw Topping Properly – For the best texture, thaw your frozen whipped topping in the refrigerator overnight, not on the counter.
🆘 Troubleshooting Guide
- Problem: My cake is soggy at the bottom.
Likely Cause: The cake was still too warm when the Jello was added, or the Jello wasn’t poured slowly enough and pooled at the bottom.
Solution: Ensure the cake is fully cooled next time. Pour the Jello mixture very slowly and evenly to give it time to absorb. - Problem: The Jello didn’t set properly in the cake.
Likely Cause: The gelatin wasn’t fully dissolved in the boiling water, or the cake wasn’t chilled for long enough.
Solution: Whisk the gelatin and water for a full 2 minutes to ensure it’s dissolved. Chill the cake for at least 1-2 hours, or even longer if your fridge is full. - Problem: My whipped topping looks runny.
Likely Cause: The topping wasn’t fully thawed and cold, or if using homemade whipped cream, it wasn’t stabilized.
Solution: Ensure frozen topping is thawed in the fridge. If making your own, add a teaspoon of cornstarch or unflavored gelatin to stabilize it.
👩🍳 Pro Chef Tips
- Flavor Fusion: Don’t be afraid to mix and match! Try a lemon cake mix with raspberry Jello, or a strawberry cake mix with lime Jello for a strawberry-limeade vibe.
- Rainbow Surprise: For a real showstopper, divide the cake into sections and use 2-3 different Jello flavors (like strawberry, lime, and berry blue) to create a rainbow effect. Perfect for birthdays!
- Homemade Touch: If you’re not a fan of boxed mix, use your favorite from-scratch white or vanilla cake recipe. Just make sure it’s sturdy enough to hold the Jello.
☕ Perfect Pairings
- A tall glass of homemade lemonade 🍋
- A scoop of creamy vanilla bean ice cream 🍨
- A refreshing pitcher of iced tea 🧊
- A simple cup of hot coffee ☕
📦 How to Store
- In the Refrigerator: This cake must be stored in the refrigerator. Cover it tightly with plastic wrap or store it in an airtight container for up to 4 days. The flavors meld and it’s often even better on day two!

Get Recipes on Pinterest
🎂 More Cakes You’ll Love
👉 💙 Bluey Cake Recipe: Easy & Adorable Pup-Tastic Treat!
👉 🍬 Magical Cotton Candy Cake Recipe (Pink & Blue Magic!) 🎂
👉 🍫 Mini Chocolate Lunchbox Cakes (With Cute Messages!) 🎀
👉 Ultimate Unicorn Cake Recipe: A Magical, Rainbow-Topped Dessert 🦄🍰
Strawberry Jello Poke Cake
Description
Dive into a slice of pure nostalgia with the Strawberry Jello Poke Cake! This dessert is a beloved American classic, rising to fame in the 1970s as a fun and creative way to elevate a simple boxed cake mix. The concept is brilliantly simple: a baked cake is poked with holes and then infused with liquid gelatin, which sets up inside the cake to create moist, flavorful tunnels of fruity goodness. It's a dessert that's as fun to make as it is to eat.
Ingredients

Instructions
-
Prepare the cake pan
Grease a 9x13-inch baking pan lightly with nonstick spray or butter.
-
Bake the cake
Prepare the white cake mix according to the package instructions using the ingredients listed on the box. Pour the batter into the prepared pan and bake until golden and fully set.
-
Poke the holes
While the cake is still slightly warm, use the handle of a wooden spoon or a thick skewer to poke holes evenly across the surface of the cake. Space them about 1 inch apart so every slice gets plenty of strawberry filling.
-
Cool the cake completely
Let the cake cool fully before adding the gelatin mixture. This step matters more than people think. Warm cake plus liquid gelatin can turn into a slightly confused sponge situation.
-
Prepare the strawberry gelatin
In a mixing bowl, whisk together the strawberry gelatin powder and boiling water until completely dissolved and smooth.
-
Pour the gelatin over the cake
Slowly pour the strawberry gelatin mixture evenly over the cooled cake, allowing it to seep into all the holes.
-
Chill until set
Transfer the cake to the refrigerator and chill for at least 1 hour, or until the gelatin is fully set inside the cake.
-
Add the whipped topping
Spread the thawed whipped topping evenly over the entire surface of the cake using an offset spatula or spoon.
-
Garnish and serve
Top with fresh sliced strawberries just before serving for extra color and flavor.
-
Slice and enjoy
Cut into squares and serve chilled. Cold straight from the fridge is the move here. Soft cake, creamy topping, bright strawberry flavor. Summer potluck behavior at its finest.