

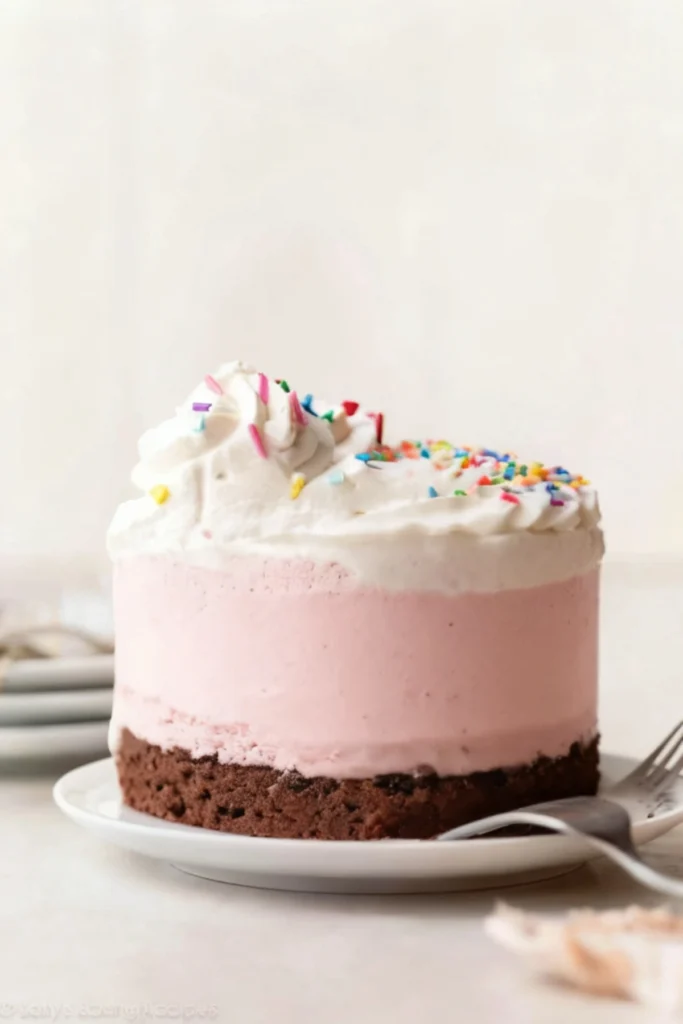
This is the dessert people suddenly become protective over. Someone cuts a tiny “sliver” that somehow weighs half a pound. Another person keeps reopening the freezer just to “check the texture.” Deeply suspicious behavior. Ice cream cake does that to people.
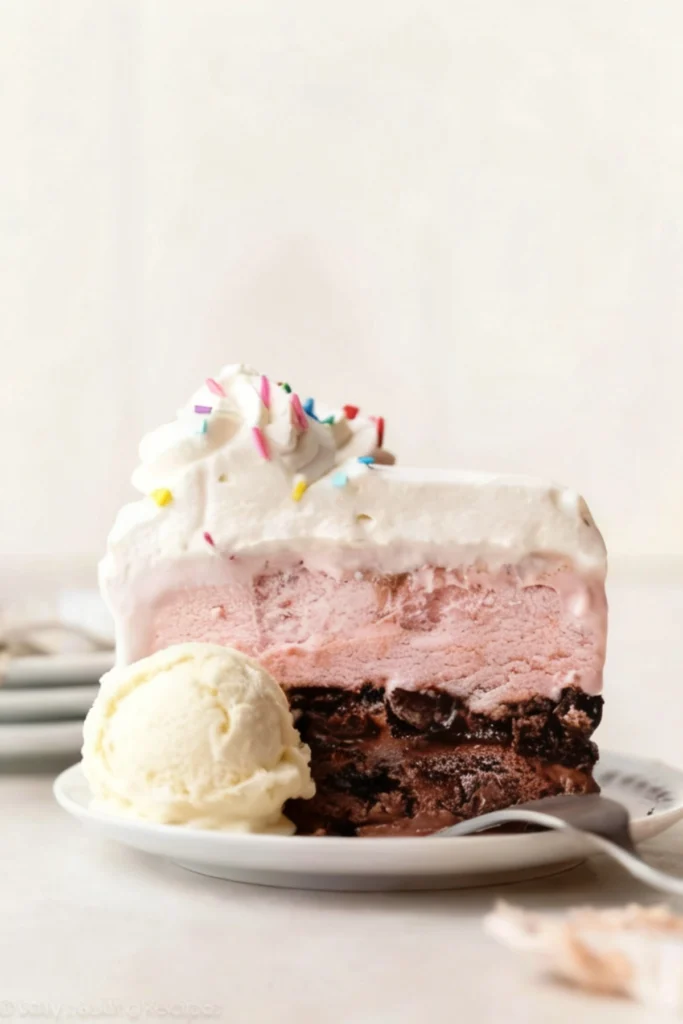
You get layers of creamy ice cream, rich hot fudge, crunchy Oreo crumbs, and fluffy whipped cream all stacked into one glorious freezer dessert. It looks dramatic on the table, but the actual work is mostly spreading things into a pan and letting the freezer handle the heavy lifting. Honestly, the freezer deserves partial credit here.
❤️ Why You’ll Love This Recipe
- Totally No-Bake – Beat the heat and keep your oven off! This recipe is all about chilling in the freezer, making it the perfect summer dessert.
- 5 Layers of Heaven – We’re talking two distinct ice cream flavors, a decadent hot fudge sauce, a crunchy Oreo center, and a cloud of fluffy whipped cream. Every bite is pure bliss.
- Perfect for Parties – A guaranteed crowd-pleaser that you can make days in advance, saving you precious time on party day. It’s a certified showstopper!
- Completely Customizable – Mix and match your favorite ice cream flavors to create your dream cake! Chocolate and peanut butter? Mint chip and vanilla? The possibilities are endless.
🛠 Tools You’ll Need
- 9-inch or 10-inch Springform Pan (at least 3 inches high) 🍰
- Plastic Wrap 🛡️
- Food Processor or Blender 🌪️
- Electric Mixer (Handheld or Stand) ⚡
- Spatula or Large Spoon 🥄
- Piping Bag & Tip (optional, for decorating) ✨
🥄 Key Ingredients
For the Cake Layers:
- Oreo Cookies (10 cookies) – Provides that iconic, irresistible chocolatey crunch in the center. Don’t skip the cream filling! 🍪
- Unsalted Butter (2 Tbsp) – This is the secret glue! It binds the Oreo crumbs, preventing the layers from separating and adding a rich flavor. 🧈
- Ice Cream (1.5 quarts of two flavors) – The star of the show! Using two different flavors adds visual appeal and a fun taste experience. Let it soften slightly for easy spreading. 🍦
- Hot Fudge (1 cup) – Homemade is highly recommended for a truly decadent, rich flavor that store-bought just can’t match. It creates a gooey, fudgy ribbon through the cake. 🍫
For the Whipped Cream Topping:
- Heavy Cream (2 cups) – Must be very cold to whip up into stable, stiff peaks for a light and airy frosting. 🌬️
- Confectioners’ Sugar (1/3 cup) – Sweetens the cream and helps stabilize it.
- Vanilla Extract (1 1/2 tsp) – Adds a lovely warmth and depth to the topping.
🍳 How to Make The Ultimate Ice Cream Cake
- Prep the Pan & Crust: Line your springform pan with two overlapping pieces of plastic wrap, letting the excess hang over the sides. In a food processor, pulse the Oreos into coarse crumbs. Mix them with the melted butter until combined. Set aside. 🥣
- Lay Down the First Ice Cream Layer: Take your first ice cream flavor out to soften for about 10 minutes. Working quickly, scoop it into the prepared pan and use a spatula or the back of a spoon to spread it into an even layer. Pop it in the freezer for 30 minutes to firm up. 🥶
- Add the Fudge & Crunch: Gently warm your hot fudge so it’s spreadable but not hot. Pour and spread half of the hot fudge over the firm ice cream layer. Sprinkle the Oreo-butter mixture evenly over the fudge. Freeze for another 30 minutes. ✨
- Complete the Ice Cream Layers: While the cake is in the freezer, let your second ice cream flavor soften for 10 minutes. Drizzle the remaining hot fudge over the Oreo layer. Quickly spoon and spread the second ice cream flavor on top, creating the final layer. 🍓
- The Big Freeze: Cover the cake tightly with plastic wrap or foil. Freeze for at least 12 hours, or up to 2 days, until it’s completely firm and solid. Patience is key here! ⏳
- Frost & Decorate: Just before serving, freeze your cake stand or serving platter for 30 minutes. In a cold bowl, whip the heavy cream, confectioners’ sugar, and vanilla until stiff peaks form. Unwrap your cake, lift it out of the pan using the plastic wrap, peel the wrap away, and place the cake on the chilled platter. Frost with whipped cream, pipe on some decorations if you feel fancy, and add sprinkles! 🎉
💡 Tips for Success
- Work Quickly! Ice cream melts fast. Have all your ingredients and tools ready to go before you start assembling to minimize melting.
- Don’t Skip the Plastic Wrap – This is non-negotiable! It prevents leaks and makes it a breeze to lift the finished cake out of the pan for slicing and serving.
- Soften, Don’t Melt – Let the ice cream sit at room temperature for just 10-15 minutes. It should be spreadable, not liquid.
- Chill Your Serving Platter – Placing a frozen cake on a room-temperature plate will cause the bottom to melt instantly. A chilled platter keeps everything perfectly frozen.
🆘 Troubleshooting Guide
- Problem: The top layer of my cake slid off when I sliced it!
Likely Cause: You may have skipped the melted butter in the Oreo layer, or the layers weren’t frozen solid enough between steps.
Solution: The butter is essential! It acts as an adhesive, binding the Oreo crumbs and helping the layers stick. Also, ensure each layer is firm before adding the next. - Problem: My whipped cream melted while I was frosting the cake.
Likely Cause: The cake, your tools, or the cream itself weren’t cold enough.
Solution: Make sure your heavy cream is straight from the fridge and use a chilled mixing bowl. Freeze your serving platter for at least 30 minutes before transferring the cake onto it. Work quickly in a cool room. - Problem: The cake is too hard to slice.
Likely Cause: It’s frozen solid, which is exactly what you want!
Solution: Run a large, sharp knife under hot water and wipe it dry before making each cut. The heated blade will glide through the frozen layers for clean, beautiful slices.
👩🍳 Pro Chef Tips
- Stabilize Your Cream: For a whipped cream that holds its shape beautifully, especially in warmer weather, beat in 1 tablespoon of instant vanilla pudding mix along with the confectioners’ sugar.
- Create a Drip Effect: Before frosting with whipped cream, use a bit of extra hot fudge (chilled to a thick but pourable consistency) to create a trendy drip effect around the top edge of the cake. Freeze for 15 minutes before adding the whipped cream.
- Texture Boost: For an even crunchier center, add a handful of mini chocolate chips or chopped nuts to your Oreo crumb mixture.
☕ Perfect Pairings
- A steaming cup of hot coffee or an iced latte ☕
- A glass of cold milk for a classic combo 🥛
- A bowl of fresh, tart berries to cut through the richness 🍓
- A glass of sparkling water with a lemon twist 🍋
📦 How to Store
- Finished Cake: Store any leftover ice cream cake tightly covered in the freezer. For best texture, enjoy within 1 week. To prevent freezer burn, press a piece of plastic wrap directly against any cut surfaces before covering the whole cake.

Get Recipes on Pinterest
🍰 More Recipes You’ll Love
- 🎃 Pumpkin Pudding Cookies Soft, Spiced & Ready in 30 Minutes!
- Valentine’s Day Brownies ❤️🍫 Ultra Fudgy Chocolate Brownies with M&M’s
- 🍪 Ultra-Soft Cinnamon Cream Cheese Cookies
- 🎀 Soft Sour Cream Cookies with Pink Frosting
The Ultimate No-Bake Ice Cream Cake 🎂🍦
Description
Capture the nostalgic joy of a classic ice cream parlor with this stunning homemade Ice Cream Cake. Inspired by the beloved Dairy Queen original, this recipe elevates the experience with five distinct layers of pure delight. It’s a completely no-bake dessert, making it the perfect project for a hot summer day or a celebration any time of year. The beauty of this cake lies in its simplicity and its impressive presentation—your guests will never believe you made it yourself!
Ingredients
Cake Layers:

Whipped Cream Topping:
Instructions
-
Prepare the pan and Oreo layer
Line a 9-inch or 10-inch springform pan with overlapping sheets of plastic wrap, leaving enough overhang to lift the cake out later. Place the Oreo cookies into a food processor and pulse into coarse crumbs. Stir in the melted butter until evenly coated. Set aside.
-
Build the first ice cream layer
Let the chocolate ice cream soften at room temperature for about 10 minutes until spreadable but not melted. Scoop it into the prepared pan and spread into an even layer using a spatula or the back of a spoon. Freeze for 30 minutes until firm.
-
Add the hot fudge and Oreo crunch
Warm the hot fudge slightly so it spreads easily. Pour half over the frozen chocolate ice cream layer and spread gently. Sprinkle the Oreo crumb mixture evenly over the fudge layer. Freeze again for 30 minutes to help everything set properly.
-
Add the second ice cream layer
Let the strawberry ice cream soften for about 10 minutes. Drizzle the remaining hot fudge over the Oreo layer, then spread the strawberry ice cream evenly on top. Smooth the surface carefully.
-
Freeze until completely firm
Cover the cake tightly with plastic wrap or foil and freeze for at least 12 hours, preferably overnight. This gives the layers time to fully firm up and slice cleanly later.
-
Make the whipped cream topping
In a cold mixing bowl, beat the heavy cream, confectioners’ sugar, and vanilla extract until stiff peaks form. The whipped cream should look thick, fluffy, and stable enough to hold its shape.
-
Decorate the cake
Remove the frozen cake from the pan using the plastic wrap overhang. Peel away the plastic wrap and transfer the cake onto a chilled serving plate or cake stand. Frost with whipped cream and decorate with sprinkles if desired. Suddenly everyone thinks you own a bakery.
-
Slice and serve
Let the cake sit at room temperature for about 5 minutes before slicing. Dip a large sharp knife into hot water and wipe it clean between each cut for neat slices. Tiny restaurant trick. Makes you look alarmingly organized.