

Some desserts carry pure summer energy. Sticky fingers. Melting ice cream. Running back outside before it drips down your wrist. These cookie ice cream sandwiches bring all of that back.
The cookies stay soft even straight from the freezer, which honestly feels like cheating a little. Add your favorite ice cream, roll the edges in chocolate chips or sprinkles, and suddenly the freezer becomes a dangerous place to casually open. Tiny act of self-sabotage. Delicious one though.

❤️ Why You’ll Love This Recipe
- No-Chill Dough – Seriously! Go from craving to cookie in under 30 minutes. This is instant gratification at its finest.
- Perfectly Soft & Chewy – These cookies are specifically designed to stay soft after freezing, so you won’t break a tooth. Every bite is pure bliss.
- Totally Customizable – Use your favorite ice cream flavor and roll the edges in anything your heart desires, from sprinkles to nuts.
- Make-Ahead Magic – A fantastic treat to have stashed in the freezer for parties, hot days, or a spontaneous dessert craving.
🛠 Tools You’ll Need
- Baking Sheets 🥣
- Parchment Paper or Silicone Mats ✨
- Stand Mixer or Hand Mixer ⚡
- Mixing Bowls
- Medium Cookie Scoop
- Ice Cream Scoop 🍨
- Wire Cooling Rack
🥄 Key Ingredients
For the Perfect Cookies:
- Unsalted Butter (softened) – Provides that rich, buttery flavor and tender texture. Make sure it’s properly softened, not melted! 🧈
- Brown & Granulated Sugar – The combination is key! Brown sugar adds moisture and chewiness, while white sugar helps the cookies spread and crisp slightly at the edges.
- An Extra Egg Yolk – Our secret weapon for ultra-rich, tender, and chewy cookies that don’t get brittle in the freezer. 🥚
- Cornstarch – This simple addition helps create an exceptionally soft cookie crumb, which is exactly what you want for a frozen treat.
- Mini Chocolate Chips – A non-negotiable! Regular chips turn into hard chunks when frozen, but mini chips stay perfectly bite-sized and distribute more chocolatey goodness. 🍫
For Assembling:
- Your Favorite Ice Cream – Go classic with vanilla or get wild with mint chip, cookie dough, or strawberry! The choice is yours. 🍦
- Toppings for Rolling – More mini chocolate chips, colorful sprinkles, or finely chopped nuts add a professional finish and a fun crunch.
🍳 How to Make Cookie Ice Cream Sandwiches
- Prep Your Station: Preheat your oven to 350°F (177°C) and line a few baking sheets with parchment paper. In a medium bowl, whisk together the flour, cornstarch, baking soda, and salt. Set it aside. 💨
- Cream the Fats & Sugars: In a large bowl using a mixer, beat the softened butter, brown sugar, and granulated sugar on medium-high speed for about 3 minutes until it’s light, fluffy, and creamy. This step whips air into the dough for a better texture.
- Combine Wet & Dry: Beat in the egg, egg yolk, and vanilla extract until just combined. Scrape down the bowl, then add the dry ingredients on low speed, mixing until just a few streaks of flour remain. Gently mix in the mini chocolate chips. Be careful not to overmix! 🍪
- Scoop & Bake: Using a medium cookie scoop (about 1.5 tablespoons), drop balls of dough about 3 inches apart onto your prepared baking sheets. Bake for 12–13 minutes. The edges will be lightly golden, but the centers will look soft and slightly underdone – that’s the secret to a soft cookie!
- Cool Completely: Let the cookies cool on the baking sheet for 5 minutes before transferring them to a wire rack. They MUST cool completely before you even think about adding ice cream, or you’ll have a soupy mess. Patience is key! ⏳
- Assemble the Sandwiches: Flip one cooled cookie over. Place a generous scoop of ice cream (about 1/4 cup) on top. Gently press another cookie on top to sandwich it all together. Work quickly!
- Roll & Freeze: Immediately roll the exposed ice cream edges in your desired topping (mini chocolate chips are classic!). Tightly wrap each sandwich in plastic wrap and place it in the freezer right away. Repeat with the remaining cookies. Freeze for at least 3 hours for the perfect firm-yet-soft texture. 🥶
💡 Tips for Success
- Don’t Overbake – The key to a soft frozen cookie is a slightly underbaked cookie. Pull them from the oven when the centers still look soft. They’ll continue to set on the hot pan.
- Uniform Scoops – Use a cookie scoop to ensure all your cookies are the same size. This makes for perfectly matched, professional-looking sandwiches.
- Work One at a Time – Assemble one sandwich, wrap it, and get it in the freezer before starting the next. Ice cream melts fast, and this prevents the first ones from turning into puddles while you finish the batch.
🆘 Troubleshooting Guide
- Problem: My cookies spread way too much and are thin and crispy.
Likely Cause: Your butter was too soft or even melted. Or, your oven temperature might be off.
Solution: Ensure your butter is softened to room temperature (it should give slightly when pressed) but not greasy or melted. If the problem persists, chill the scooped dough for 20-30 minutes before baking. - Problem: My cookies are rock-hard after freezing.
Likely Cause: You overbaked the cookies, or you used regular-sized chocolate chips.
Solution: Always pull the cookies from the oven when the centers look soft. Stick to mini chocolate chips, as they don’t freeze as hard as their larger counterparts.
👩🍳 Pro Chef Tips
- Salty Finish: Before baking, sprinkle a tiny pinch of flaky sea salt on top of each cookie dough ball. The salt enhances the chocolate flavor and creates an irresistible sweet-and-salty combination.
- Flavor Boost: Add 1 teaspoon of espresso powder along with your dry ingredients. It won’t make the cookies taste like coffee, but it will deepen and intensify the chocolate flavor beautifully.
- Perfect Circles: As soon as the cookies come out of the oven, use a round cookie cutter (larger than the cookie) to gently scoot the edges into a perfect circle. This is a pro trick for flawless sandwiches.
☕ Perfect Pairings
- A tall, cold glass of milk 🥛
- A drizzle of homemade hot fudge or caramel sauce 🤎
- A freshly brewed cup of coffee or an iced latte ☕
📦 How to Store
- Unassembled Cookies: Store baked and cooled cookies in an airtight container at room temperature for up to 3 days before assembling.
- Assembled Sandwiches: Tightly wrapped individually in plastic wrap, the cookie ice cream sandwiches can be stored in the freezer for up to 3 months.
🎂 More Cakes You’ll Love
👉 💙 Bluey Cake Recipe: Easy & Adorable Pup-Tastic Treat!
👉 🍬 Magical Cotton Candy Cake Recipe (Pink & Blue Magic!) 🎂
👉 🍫 Mini Chocolate Lunchbox Cakes (With Cute Messages!) 🎀
👉 Ultimate Unicorn Cake Recipe: A Magical, Rainbow-Topped Dessert 🦄🍰

Get Recipes on Pinterest
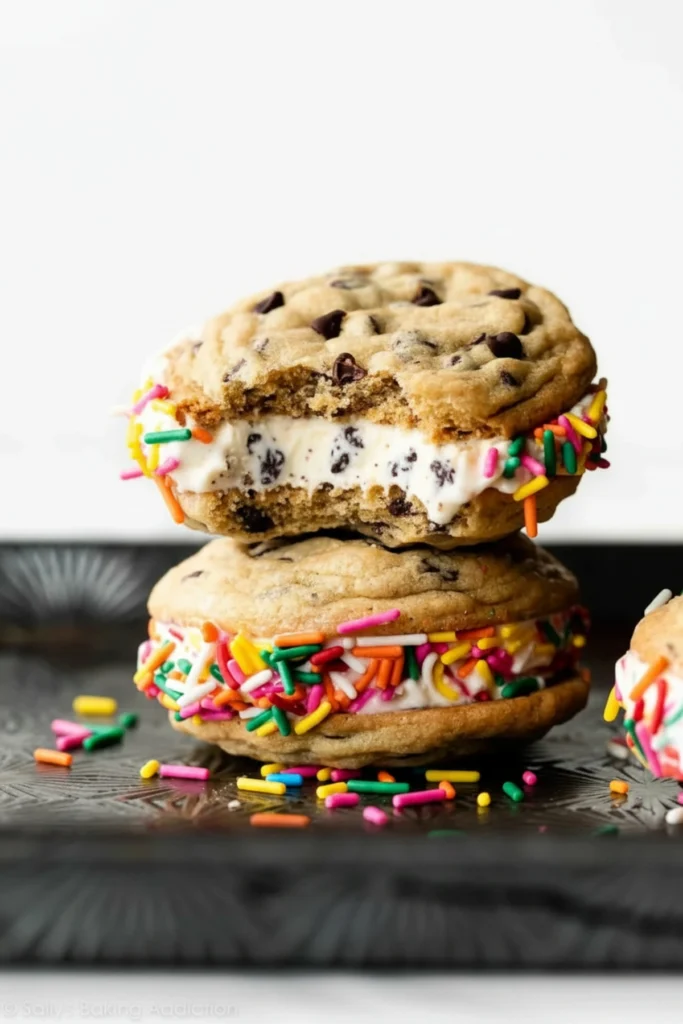
Ultimate Cookie Ice Cream Sandwiches 🍪🍦
Description
There's a certain nostalgia tied to the classic ice cream sandwich, a treat many of us remember as the iconic "Chipwich." This recipe is a heartfelt homage to that beloved dessert, elevated with the magic of homemade baking. We've engineered the perfect chocolate chip cookie for the job—one that requires no chilling and is specifically designed to remain wonderfully soft and chewy even after being frozen. The secret lies in a touch of cornstarch and an extra egg yolk, which create a tender crumb that yields beautifully with every bite.
Ingredients
For the Cookies:

For Assembly:
Instructions
-
Preheat oven to 350°F (177°C). Line baking sheets with parchment paper.
-
Whisk flour, cornstarch, baking soda, and salt together.
-
In a separate large bowl, cream the softened butter and both sugars together with a mixer until light and fluffy (about 3 minutes).
-
Beat in the egg, egg yolk, and vanilla.
-
On low speed, gradually mix in the dry ingredients, followed by the mini chocolate chips, until just combined.
-
Scoop 1.5-tablespoon balls of dough onto baking sheets, 3 inches apart.
-
Bake for 12–13 minutes, until edges are lightly browned but centers are soft.
-
Cool on the pan for 5 minutes before transferring to a wire rack to cool completely.
-
To assemble, place a scoop of ice cream between two cooled cookies. Gently press together.
-
Roll the sides in toppings, immediately wrap in plastic wrap, and freeze for at least 3 hours before serving.