There’s something about peanut butter and chocolate that never really goes out of style. Maybe it’s the balance of sweet and salty, or maybe it’s the simple comfort of a treat that feels both nostalgic and homemade at the same time. These Peanut Butter Easter Eggs capture that feeling perfectly.
Inspired by the classic Reese’s eggs many of us grew up with, this homemade version brings a richer peanut butter filling and a smooth chocolate shell you can customize however you like. The speckled robin’s-egg coating adds a playful Easter touch that looks beautiful on a dessert table, but the real magic is inside creamy, peanut buttery, and just sweet enough to keep you reaching for another.
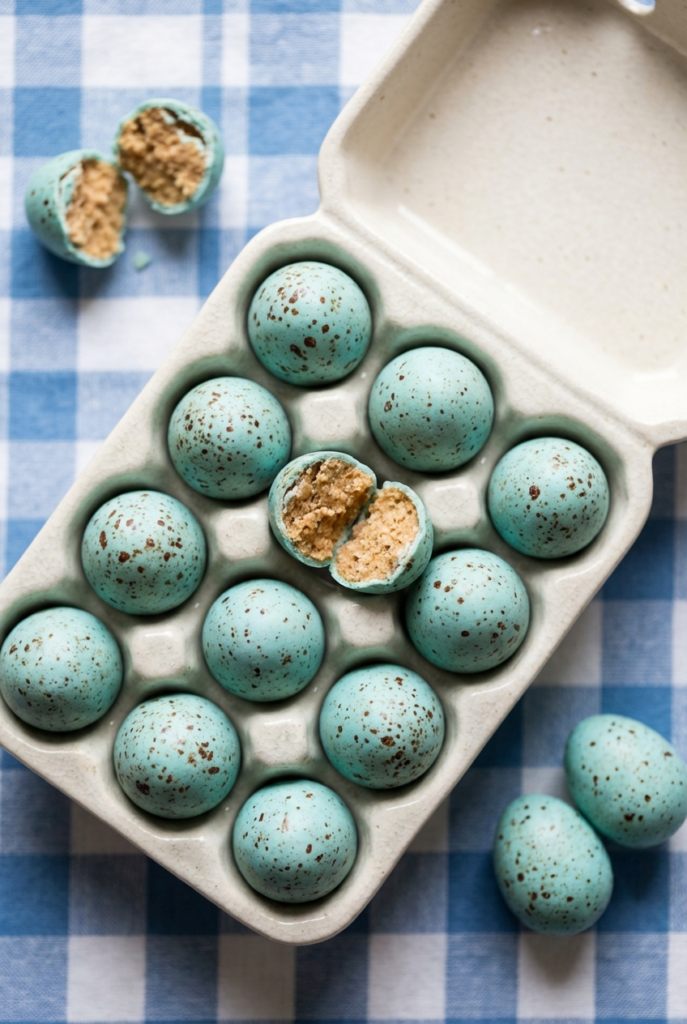
❤️ Why You'll Love This Recipe
- Better Than Store-Bought – A from-scratch Reese's peanut butter egg with cleaner ingredients, lower sugar, and a filling that's richer and more satisfying than the original 🥜
- Stunningly Beautiful – Naturally dyed robin's egg blue white chocolate coating with hand-flicked cocoa speckles makes these look like actual Easter eggs 🐣
- Only 6 Filling Ingredients – No complicated pantry list. Simple, wholesome, and naturally sweetened with maple syrup
- No Baking Required – Everything is mixed, shaped, dipped, and chilled. No oven needed whatsoever ❄️
- Naturally Colored – Blue spirulina and matcha dye the chocolate without artificial food coloring, making these a feel-good treat
- Endlessly Customizable – Use dark or milk chocolate for a classic look, or make them any color you like for any occasion 🎨
- Large mixing bowl 🥣
- Hand mixer or sturdy spatula
- Parchment paper-lined baking sheet
- Microwave-safe bowl
- Short drinking glass or deep vessel (for dipping) 🥛
- Toothpicks (for dipping the eggs)
- Pastry brush (for the speckles) 🖌️
- Small bowl (for the cocoa speckle mixture)
- Apron — this step gets messy! 😄
🥄 Key Ingredients
Peanut Butter Egg Filling:
- Natural runny peanut butter (1¼ cup, no sugar added) – The star of the filling. Must be natural and runny for the right consistency — standard peanut butter is too thick and sweet 🥜
- Maple syrup (¼ cup) – Natural sweetener that keeps the sugar level lower than most peanut butter egg recipes 🍁
- Powdered sugar (¼ cup) – A small amount for creaminess and structure. Reduces it to just maple syrup if preferred, but texture will vary
- Almond flour (⅓ cup) – The secret binder that holds the peanut butter mixture together into a shapeable, scoopable consistency
- Vanilla extract (½ tsp) – Adds warmth and depth to the filling 🌿
- Salt (pinch) – Balances the sweetness and enhances the peanut butter flavor
White Chocolate Coating:
- White chocolate melting wafers (8 oz) – Best for coating because it dyes beautifully to mimic a real egg. Dark or milk chocolate works too for a classic Reese's look 🍫
- Coconut oil (2 tsp) – Thins the melted chocolate slightly for a smoother, more even dipping consistency
- Blue spirulina (½ tsp) + matcha powder (¼ tsp) – All-natural colorants that create the perfect robin's egg blue. Substitute with a 2:1 ratio of blue and green food coloring 💚💙
For the Speckles:
- Cocoa powder (1 tsp) + water (1 tbsp) – Whisked together into a thin paint that creates realistic egg speckles when flicked with a pastry brush 🎨
🥚 How to Make Peanut Butter Easter Eggs
- Make the Filling: In a large mixing bowl, beat together the peanut butter, maple syrup, powdered sugar, almond flour, vanilla extract, and salt until fully combined and smooth. 🥜
- Shape the Eggs: Portion the filling into 2-tablespoon mounds. Roll each portion into a ball with your hands, then gently shape into an oval egg form. Place on a parchment-lined baking sheet. 🥚
- Freeze: Transfer the shaped eggs to the freezer while you prepare the coating. Semi-frozen eggs are key — they make the chocolate coating set up fast and cleanly. ❄️
- Prepare the Speckle Mix: In a small bowl, whisk together the cocoa powder and water until smooth. Set aside. 🖌️
- Melt the White Chocolate: Add white chocolate wafers and coconut oil to a microwave-safe bowl. Microwave in 15–20 second intervals, stirring well between each, until fully melted and smooth. Whisk in the blue spirulina and matcha powder (or food coloring) and adjust the color to your liking. Pour into a short drinking glass for easy dipping. 🍫
- Dip the Eggs: Remove eggs from the freezer. Stick a toothpick into the bottom of each egg and dip fully into the colored white chocolate. Let the excess drip off. Wait until the coating is mostly set, then place back on the parchment sheet and immediately remove the toothpick before the chocolate fully hardens (or the coating may crack). ✨
- Add the Speckles: Dip a pastry brush into the cocoa water mixture. Holding it about 8 inches above the baking sheet, flick the tip of the brush sharply over the eggs to create realistic speckles. Wear an apron — this step is gloriously messy! 🎨
- Set & Chill: Refrigerate the speckled eggs for about 10 minutes until the chocolate coating is fully dry and firm. Serve and enjoy! 🐣
💡 Tips for Success
- Use Runny Natural Peanut Butter – The consistency of the filling depends entirely on this. Thick or sugary peanut butter will make the mixture too stiff and hard to work with.
- Freeze Before Dipping – This is the most important step. Semi-frozen eggs keep their shape during dipping and allow the chocolate to set almost instantly instead of pooling.
- Remove the Toothpick at the Right Time – Wait until the coating is mostly (but not fully) hardened before removing the toothpick. Too early = chocolate runs; too late = coating cracks.
- Pour Chocolate into a Tall Narrow Glass – A short drinking glass gives you the depth needed to fully submerge the egg in one smooth dip.
- Wear an Apron for the Speckles – Flicking the cocoa mixture is fun but unpredictable. Protect your clothes and nearby surfaces!
🆘 Peanut Butter Easter Eggs Troubleshooting Guide
Problem: Filling is too soft to shape into eggs
Likely Cause: Peanut butter too runny or too warm.
Solution: Refrigerate the filling for 15–20 minutes before shaping. If still too soft, add an extra tablespoon of almond flour and mix well.
Problem: White chocolate coating pools at the bottom when placed on the sheet
Likely Cause: Eggs weren't frozen enough before dipping.
Solution: Freeze the eggs for at least 15–20 minutes until semi-solid. The cold temperature is what causes the chocolate to set on contact.
Problem: Toothpick hole leaves a crack or gap in the coating
Likely Cause: Toothpick removed too late after the chocolate fully set.
Solution: Remove the toothpick while the chocolate is still slightly tacky but no longer wet. Practice on the first egg to get the timing right.
Problem: White chocolate seized and became grainy
Likely Cause: Overheated or a drop of water got into the chocolate.
Solution: Melt in short 15–20 second bursts only, stirring well each time. Make sure all bowls and tools are completely dry before contact with chocolate.
Problem: Speckles are too large and look like blobs
Likely Cause: Cocoa mixture too thick or brush held too close.
Solution: Thin the cocoa mixture with a few extra drops of water and hold the brush at least 8 inches above the eggs when flicking.
👩🍳 Pro Chef Tips
- Dark or Milk Chocolate Version: Skip the coloring and use dark or milk chocolate for a coating that more closely mimics the classic Reese's peanut butter egg flavor profile 🍫
- Custom Colors: Make pastel pink, lavender, or yellow eggs using natural food coloring for a full Easter egg rainbow on your dessert table 🌈
- Smaller Portion Option: Use 1-tablespoon portions instead of 2 for bite-sized mini eggs — perfect for Easter baskets and candy dishes
- Add a Crunch: Mix chopped roasted peanuts or crispy rice cereal into the filling before shaping for added texture
- Almond Butter Swap: Substitute the peanut butter with natural almond butter or sunflower seed butter for a nut-free or allergy-friendly version 🌻
☕ Perfect Pairings: What to Serve with Peanut Butter Easter Eggs
- Easter Candy Spread: Alongside homemade Peeps, carrot cake cupcakes, and Easter dirt cake for the ultimate spring dessert table 🐰
- Gift Basket Treat: Nestled in shredded paper grass with mini chocolate eggs and jelly beans for a beautiful homemade Easter basket 🧺
- Dessert Platter: Paired with chocolate truffles, coconut macaroons, and shortbread for a crowd-pleasing cookie and candy board
- Kids' Party: Served on a spring-themed dessert table with pastel-colored treats and lemonade 🌸
- Drinks: Cold milk, a rich hot chocolate, or a peanut butter banana smoothie ☕
📦 How to Store
- Room Temperature: Can be stored in an airtight container at room temperature, but only if your home is cool. Warm environments will soften both the coating and filling.
- Refrigerator: Best storage option — keep in an airtight container in the fridge for up to 2 weeks. The coating stays firm and the filling stays perfectly creamy. ❄️
- Freezer: Store in an airtight container in the freezer for up to 4 months. Let defrost at room temperature for at least 15 minutes before eating to avoid cracking a tooth on the frozen filling!
📌 More Recipes You’ll Love
👉 🍫 Ultimate Brownie Cookie Recipe: Fudgy, Crinkly & Irresistible!
👉 💙 Bluey Cake Recipe: Easy & Adorable Pup-Tastic Treat!
👉 Warning: This Nutella Cookie Pie Might Go Viral 📸🍪