

🍰 A Love Letter to Red Velvet
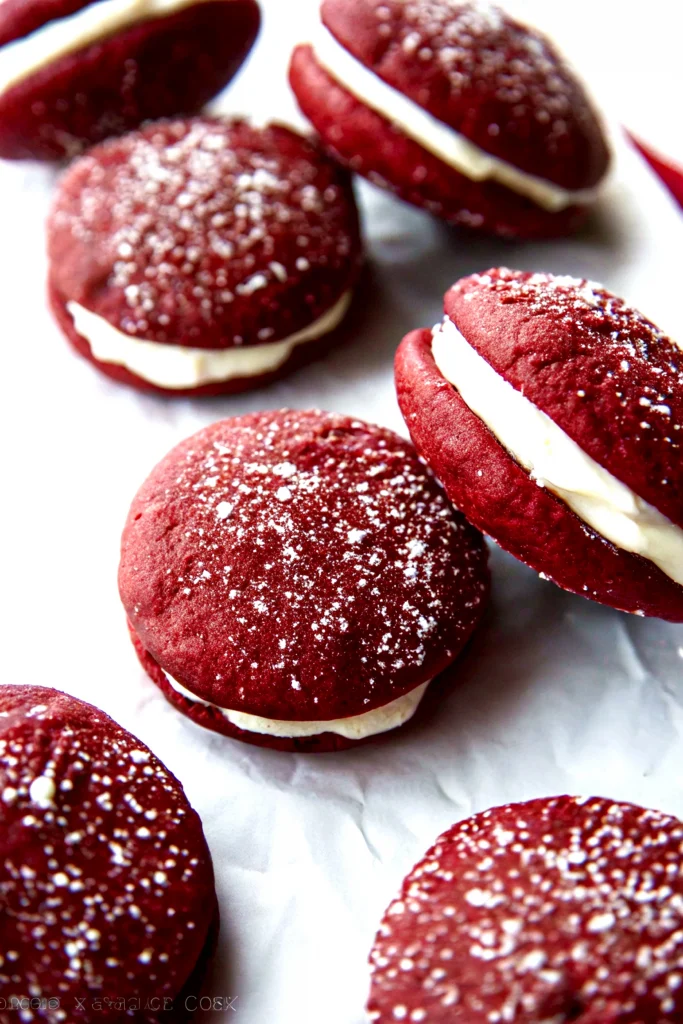
These Red Velvet Whoopie Pies are a delightful no-bake dessert that combines the best of a soft, cake-like cookie with a tangy, rich cream cheese frosting.
Inspired by the classic red velvet cake, these whoopie pies are vibrant, flavorful, and perfectly portable, making them ideal for bake sales, birthdays, holidays, or any special occasion.
💕 Why You’ll Love These Red Velvet Whoopie Pies
• Bakery-Quality at Home: Achieve professional-looking and tasting whoopie pies with simple ingredients and easy steps.
• Irresistibly Soft & Creamy: Perfect contrast between tender red velvet cookies and silky, tangy cream cheese filling.
• Perfect for Any Occasion: Vibrant color and rich flavor make them a hit for Valentine’s Day, birthdays, holidays, or everyday treats.
• Freezer-Friendly: Cookies and assembled whoopie pies can be frozen up to 2 months for make-ahead convenience.
• Fun to Make: Enjoyable baking project for beginners and experienced bakers alike.
💬 “It’s like red velvet cake… in cookie form!”
Key Ingredients & Why They Shine 🌟
Cocoa Powder 🧁
Just a touch gives red velvet its classic taste — rich, not too chocolatey. Use Dutch-processed for a smooth texture.
Buttermilk 🍶
Adds that slight tang and keeps the cookies tender and moist — don’t skip it!
Unsalted Butter 🧈
For both the cookies and the frosting — soft, creamy, and perfectly rich.
Cream Cheese 🧀
The heart of the filling! Use full-fat, room temp cream cheese for silky smooth results.
Vanilla Extract 🍦
Lifts all the flavors, especially in the frosting — a must.
Red Gel Food Coloring 🧪
For that bold, beautiful hue ❤️ A little goes a long way.
Egg 🥚
Helps bind everything and adds richness — always use room temperature.
❤️ How to Make Red Velvet Whoopie Pies
Part 1: Make the Cookie Batter
- Prepare Oven & Dry Ingredients: Preheat oven to 350°F (175°C). Line baking sheets with parchment paper. Whisk flour, cocoa, baking soda, and salt in a medium bowl.
- Cream Wet Ingredients: Beat unsalted butter and brown sugar until light and fluffy.
- Add Remaining Wet Ingredients: Mix in egg, vanilla, vinegar, buttermilk, and red gel food coloring until just combined.
- Combine & Chill: Gradually add dry ingredients, mixing on low speed. Do not overmix. Chill batter 15 minutes.
Part 2: Scoop & Bake Cookies
- Scoop Cookies: Use a medium cookie scoop (~1.5 tbsp) to drop mounds on parchment-lined sheets.
- Bake: 10–12 minutes until domed and springy. Edges set, centers soft.
- Cool: Cool on sheets a few minutes, then transfer to wire rack. Cookies must be fully cooled before filling.
Part 3: Make Cream Cheese Filling
- Beat Butter & Cream Cheese: Mix until smooth and creamy (2–3 mins).
- Add Powdered Sugar: Gradually mix in sugar, then increase speed and beat until fluffy.
- Finish Filling: Add vanilla and pinch of salt, beat on high 3 minutes until light and airy.
Part 4: Assemble Whoopie Pies
- Match Cookies: Pair similar-sized cookies.
- Fill: Pipe or spoon frosting onto flat side of one cookie.
- Top: Place second cookie on top, press lightly.
- Chill (Optional): Chill 15–20 minutes for firmer pies.
Red Velvet Tips You’ll Thank Us For 💡
🔸 Don’t overmix your batter — it keeps the cookies tender
🔸 Use gel food coloring for vibrant red (not liquid)
🔸 Chill the frosting for 10 mins before assembling for easier piping
🔸 Match cookies by size for the prettiest sandwiches
🔸 Want extra decadence? Add white chocolate chips to the dough 😍
How to Store Your Whoopie Pies 📦
🫙 Airtight container at room temp: up to 2 days
🧊 Fridge: 5–7 days
❄️ Freeze (filled or unfilled): up to 2 months
➡️ Let them come to room temp before serving for best texture
Just let them come to room temp before enjoying that soft, creamy bite 😍
🆘 Troubleshooting Guide
Dry or tough cookies: Overmixing or overbaking. Mix until just combined; bake 10–12 mins.
Flat cookies: Butter too soft, oven too low, or insufficient flour. Use slightly firm butter, check oven temp, measure flour accurately.
Runny frosting: Butter or cream cheese too warm, or too little sugar. Chill ingredients, add sugar gradually, or chill frosting 30 mins.
Cracked cookies: Oven too hot or too much leavening. Ensure accurate oven temp; slight cracks are normal.
✨ Final Verdict
These Red Velvet Whoopie Pies are soft, creamy, and nostalgic with a bold, modern twist. If red velvet cake had a fun little cousin — this would be it.
🎉 Bake them for birthdays, showers, holidays — or whenever your sweet tooth calls.
📸 Don’t forget to snap a pic and tag us @SweetTreatsRecipe — we LOVE seeing your creations!
📌 You’ll Also Love
👉 🍫 Chocolate Whoopie Pies: Fudgy Cookies with Fluffy Vanilla Filling
👉 🍫 Ultimate Brownie Cookie Recipe: Fudgy, Crinkly & Irresistible!
👉 💙 Bluey Cake Recipe: Easy & Adorable Pup-Tastic Treat!

Get Recipes on Pinterest
Red Velvet Whoopie Pies : Soft, Creamy & Irresistible🎂✨
Description
These Red Velvet Whoopie Pies are soft, vibrant, and filled with rich cream cheese frosting. With a texture between a cupcake and a cookie, they’re the perfect festive treat for birthdays, bake sales, or any day that needs a little extra sweetness. Easy to make, freezer-friendly, and totally irresistible!
Ingredients
For the Cookies


For the Cream Cheese Filling
👩🍳 How to Make Red Velvet Whoopie Pies
-
1. Make the Cookie Batter
-
✅ Preheat oven to 350°F (175°C)
-
✅ Line baking sheets with parchment
-
Whisk flour, cocoa, baking soda, and salt
-
In another bowl, beat butter + brown sugar until light and fluffy
-
Mix in egg, vanilla, vinegar, buttermilk, and food coloring
-
Add dry ingredients gradually; don’t overmix
-
Chill batter for 15 minutes
2. Scoop & Bake
-
Use a medium cookie scoop (about 1.5 tbsp)
-
Space evenly on trays
-
Bake 10–12 mins until domed and springy
-
Let cool completely before filling
3. Make the Filling
-
Beat butter + cream cheese until smooth (2–3 mins)
-
Add powdered sugar gradually
-
Mix in vanilla + pinch of salt
-
Beat until fluffy (3 mins on high = magic)
4. Assemble
-
Match cookies by size
-
Pipe or spoon frosting on the flat side of half
-
Top with the second cookie and gently press
-
Chill 15–20 mins if you want a firmer set