The Perfect Matilda Chocolate Cake: A Fudgy, Moist Indulgence

Servings: 10 Total Time: 1 hr Difficulty: Intermediate
Cakes & bakes pinit

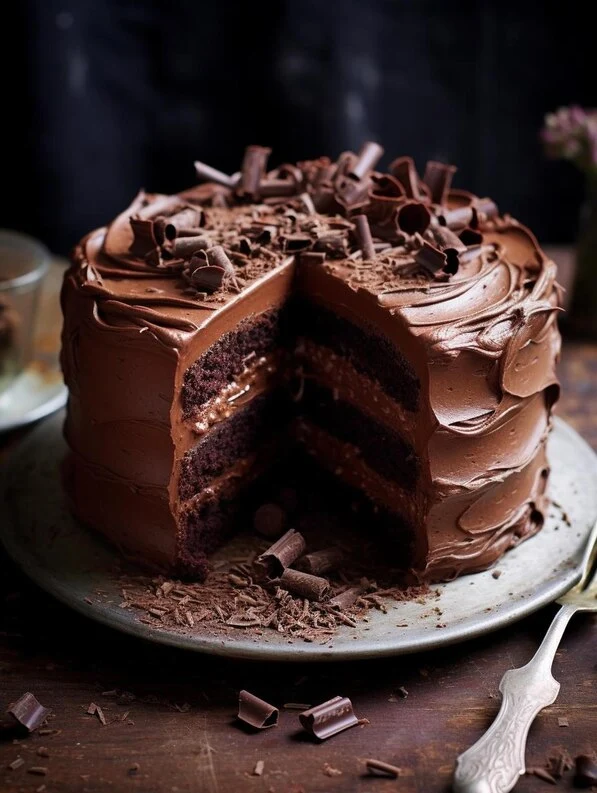
Rich, moist, and unapologetically indulgent just like in the movie.

There’s something truly magical ✨ about a perfect chocolate cake.
It can turn an ordinary day into a celebration 🎉, bring smiles 😊 to faces of all ages, and create memories that last a lifetime 💞.

And when it comes to iconic chocolate cakes, few are as legendary as the Matilda Chocolate Cake a dessert that embodies pure indulgence and childhood nostalgia 🧒🍰.

This is more than just cake.
It’s a trip back to simpler times ⏳ when the joy of chocolate 🍫 could make everything right.

Inspired by the unforgettable scene in Matilda 🎬 where one single slice captivated an entire generation—this cake brings that same wow factor 😍 to your own kitchen.
Rich, moist, and deeply chocolatey, it’s the kind of dessert you’ll come back to again and again 🔁.

Each bite is a reminder of why we love chocolate so much:
its comforting sweetness 🍬, its luxurious depth 🌑, and its power to bring people together 🤝.

As a dedicated chocoholic 🍫❤️ and superfan of this iconic movie moment, I’ve spent countless hours perfecting this recipe.
From the tender crumb to the luscious filling and glossy frosting, every detail was tested (and tasted! 😋) until it was just right.

Now, I’m so excited to share it with you 🎁.

Key Ingredients

  1. Cocoa Powder – Provides the rich, chocolatey base for both the cake and the glaze.
  2. Cake Flour – Ensures a light, tender crumb with a smooth texture.
  3. Egg Yolks & Whites – Egg yolks add richness, while whipped egg whites create a light, fluffy structure.
  4. Cooking Oil – Keeps the cake moist and enhances the chocolate flavor without overpowering it.
  5. Starch Syrup (or Honey) – Adds a subtle sweetness and helps maintain the cake’s moisture.
  6. Sugar – Sweetens the cake and balances the cocoa’s natural bitterness.
  7. Vanilla Extract – Enhances the overall flavor, giving the cake a warm, aromatic note.
  8. Butter – Contributes to the glaze’s creamy, melt-in-your-mouth texture.
  9. Milk & Sweetened Whipped Cream – Add moisture and softness to the cake and glaze, creating a smooth, creamy finish.
  10. Dark & Milk Chocolate – The stars of the glaze, providing depth and a luxurious chocolate

Top 5 reasons why this Matilda Chocolate Cake is the best:

As a dedicated chocoholic and a huge fan of the iconic Matilda Chocolate Cake, I’ve been on a mission to craft the perfect chocolate cake recipe.

Over the years, I’ve shared many popular chocolate cakes… But this one truly captures the essence of chocolate indulgence. 😍

Inspired by the unforgettable scene in Matilda, this cake brings you right back to that moment with its deep, rich flavor and perfectly moist texture.

✔️ Pure, Intense Chocolate Flavor

No diluted cocoa or sugar overload here. Just bold, luxurious chocolate in every bite.

✔️ Moist and Light

A cake that’s soft, fluffy, and never dense. It melts in your mouth and keeps you coming back for more. (Yes, even a third slice.)

✔️ Creamy, Dreamy Filling

That luscious chocolate cream layer? Velvety smooth, with just the right hint of sweetness to balance the deep glaze. The contrast = perfection.

✔️ Glossy, Foolproof Frosting

That rich, shiny finish? It’s not just for show. This frosting is deeply chocolatey, soft, and super easy to spread. No stress, no cracks—just glossy gorgeousness every time.

✔️ No Fancy Ingredients or Tricks

This showstopping cake is totally beginner-friendly. Simple pantry staples + no-fail steps = bakery-level results at home.

How To Make Matilda Chocolate Cake

Mixing the cocoa base with liquid ingredients" and "Whisking egg yolks with sugar to a pale, creamy consistency

Preparing the Cocoa Mixture : In a large bowl, add the cocoa powder and a pinch of salt. Then, pour in the cooking oil, milk, and 20 g of starch syrup (or honey). Mix well until all ingredients are fully combined. Sift the mixture through a sieve to remove any lumps and set aside.

Preparing the Egg Yolks : Separate the egg yolks from the whites and place the yolks in a bowl. Add a few drops of vanilla extract and 30 g of sugar. Whisk until the mixture is pale and frothy.

Folding cocoa mixture into the egg base" and "Sifting flour into the batter for a smooth consistency

Incorporating the Cocoa Mixture : Gently fold the prepared cocoa mixture into the beaten egg yolk mixture. Use a spatula to fold carefully, maintaining the lightness of the batter.

Adding the Dry Ingredients : Sift the cake flour into the batter. Then, carefully fold in the cocoa mixture in several parts, making sure not to overmix to keep the batter light and airy.

Chocolate glaze ingredients ready to be melted" and "Freshly baked chocolate cake with a cracked top

Preparing the Chocolate Glaze : In a microwave-safe bowl, add 100 g of milk chocolate and 150 g of dark chocolate in pieces. Add a pinch of salt, 20 g of starch syrup, 50 g of butter, and 200 g of sweetened whipped cream. Microwave in 30-second intervals, stirring between each interval, until the chocolate and butter are fully melted and the mixture is smooth. Mix well and refrigerate for 2 to 3 hours.

Baking the Cake : Pour the batter into a prepared cake pan (lined with parchment paper or greased). Bake in a preheated oven at 170°C (340°F) for 20 to 25 minutes, or until a toothpick inserted into the center comes out clean. Let the cake cool completely before removing it from the pan and assembling.

Tips to Perfect This “Matilda” Chocolate Cake

Here are some expert tips to help you achieve the ultimate Matilda Chocolate Cake every time:

  1. Use Room Temperature Ingredients
    Ensure that your eggs, butter, and any refrigerated ingredients are at room temperature before starting. This makes it easier to mix the batter evenly and helps create a smooth, lump-free texture for the cake.
  2. Whip the Egg Whites to Firm Peaks
    For the perfect light and fluffy texture, whip the egg whites until they form firm, glossy peaks. This step is crucial for giving the cake its airy structure. Gently fold the whites into the batter in stages to avoid deflating them, preserving the fluffiness.
  3. Don’t Overmix the Batter
    When incorporating the dry ingredients and cocoa mixture, mix gently just until everything is combined. Overmixing can lead to a dense and heavy cake, so use a light hand to keep the batter airy.
  4. Let the Cake Cool Completely Before Frosting
    Allow the cake layers to cool fully on a wire rack before you start assembling. A warm cake can cause the frosting to melt and slide, so patience is key. Once cooled, cut the layers evenly to make sure the filling and glaze are distributed smoothly.
  5. Soften the Refrigerated Cream Before Spreading
    If the cream becomes too firm after refrigeration, give it a quick stir with a spatula to bring it back to a spreadable consistency. This will make it easier to apply a smooth, even layer on the cake. For a more polished finish, use a cake scraper or offset spatula to create clean edges.

By following these tips, you’ll ensure that your Matilda Chocolate Cake turns out flawless every single time—rich, moist, and bursting with chocolate goodness!

Matilda Chocolate Cake

Storing & Freezing

Storing: To keep your Matilda Chocolate Cake fresh, store it in an airtight container at room temperature for up to 3 days. If you prefer a chilled cake, you can also refrigerate it for up to 5 days—just make sure it’s well-covered to prevent the cake from drying out.

Freezing: This cake freezes beautifully! To freeze, wrap each slice (or the whole cake) tightly in plastic wrap and then in a layer of aluminum foil. Store in the freezer for up to 3 months. When you’re ready to enjoy, let the cake thaw in the refrigerator overnight. For the best texture, allow it to come to room temperature before serving.

Tip: If you’re planning to freeze the cake, consider freezing the layers separately without the frosting. Frost the cake once it’s thawed for a fresher taste!

The Perfect Matilda Chocolate Cake: A Fudgy, Moist Indulgence

Difficulty: Intermediate Prep Time 30 mins Cook Time 25 mins Rest Time 5 mins Total Time 1 hr
Cooking Temp: 170  C Servings: 10 Estimated Cost: $ 10
Best Season: Winter, Cozy Winter Evenings

Description

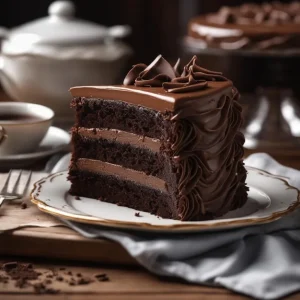
This decadent Matilda-inspired chocolate cake is rich, moist, and topped with a luscious chocolate glaze. With layers of airy cake and creamy chocolate frosting, it's a chocolate lover's dream come true. Simple to make, it's perfect for any celebration or a cozy weekend treat.

Ingredients

Cooking Mode Disabled

For The Cake

For The Chocolate Cream Filling

For The Chocolate Glaze

Instructions

Preparing the Cocoa Mixture

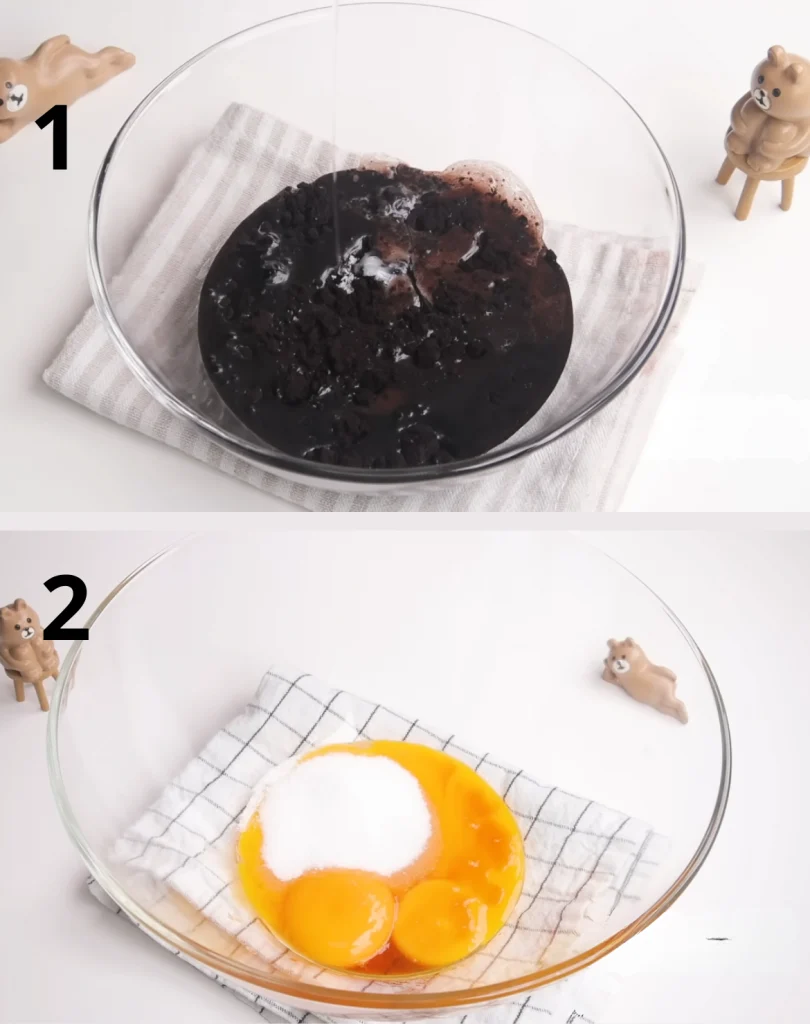
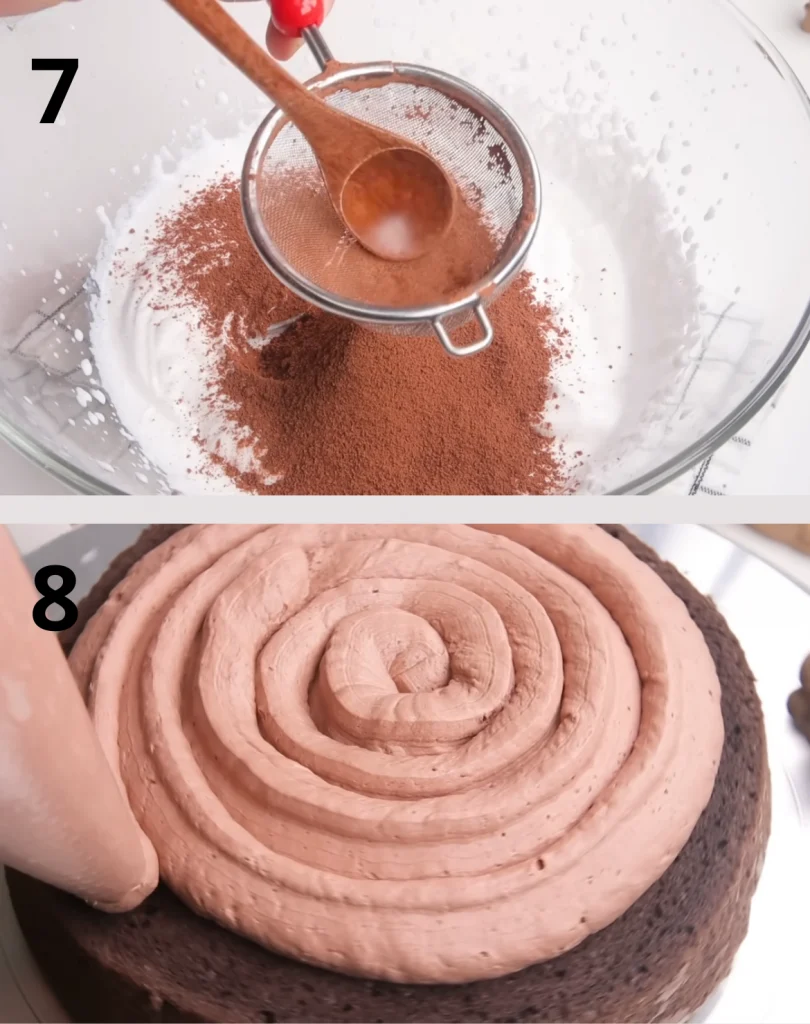
  1. Cocoa mixture: In a large bowl, add the cocoa powder and a pinch of salt. Then, add the cooking oil, milk, and 20 g of starch syrup (or honey). Mix well until all ingredients are well combined.

  2. Sift the mixture: Pass this mixture through a sieve to remove any lumps. Set it aside.

Preparing the Egg Yolks

  1. Separate the eggs: Separate the egg yolks from the whites. Place the yolks in a bowl. Add a few drops of vanilla extract and 30 g of sugar to the yolks, then whisk until the mixture is pale and frothy.

Preparing the Egg Whites

  1. Beat the egg whites: In another clean bowl, beat the egg whites with an electric mixer. Gradually add 70 g of sugar while continuing to beat until the egg whites form stiff, glossy peaks.

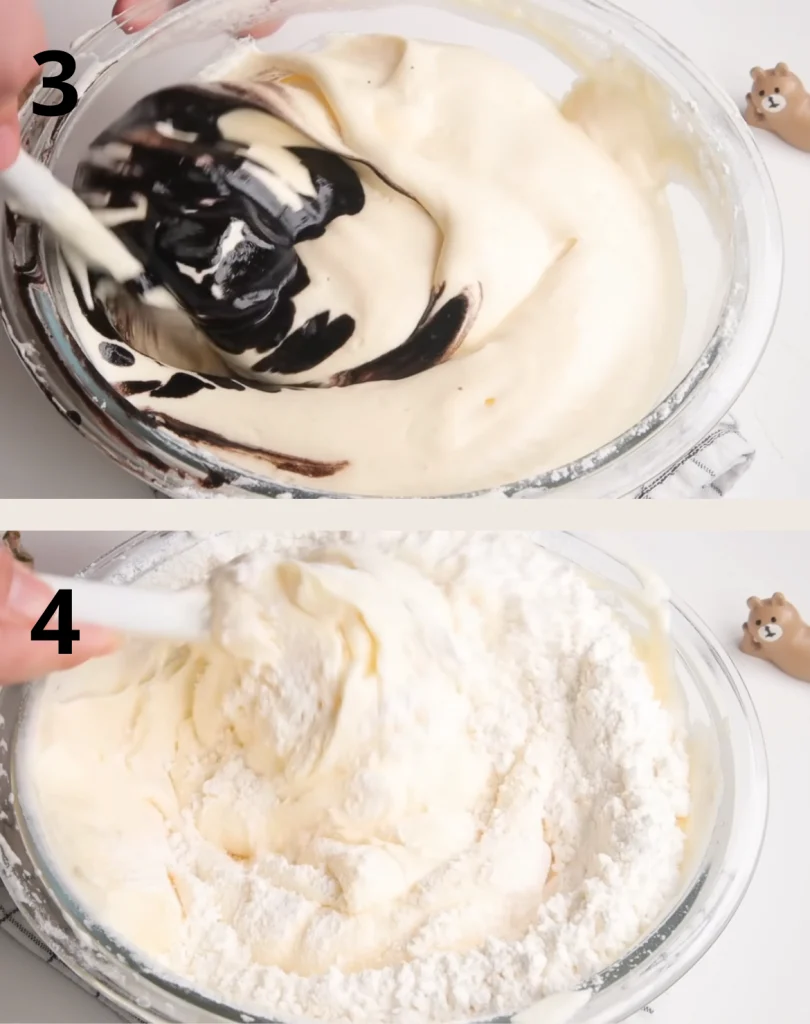
  2. Incorporate the egg whites: Gently fold the egg whites into the yolk mixture in three parts using a spatula, making sure not to deflate the batter.

Adding the Dry Ingredients

  1. Add the flour: Sift the cake flour into the batter. Then, gently fold in the cocoa mixture you prepared earlier, mixing until the batter is smooth and homogeneous. Be careful not to overmix to keep the texture light.

Baking

  1. Bake the cake: Pour the batter into a prepared cake pan (lined with parchment paper or greased). Bake in a preheated oven at 170°C (340°F) for 20 to 25 minutes, or until a toothpick inserted into the center comes out clean. Let the cake cool completely before removing it from the pan and assembling.

Preparing the Chocolate Glaze

  1. Combine the ingredients: In a microwave-safe bowl, add 100 g of milk chocolate and 150 g of dark chocolate in pieces. Add a pinch of salt, 20 g of starch syrup, 50 g of butter, and 200 g of sweetened whipped cream.

  2. Microwave to melt: Place the bowl in the microwave and heat in 30-second intervals, stirring between each interval, until the chocolate and butter are fully melted and the mixture is smooth.

  3. Mix well: Once the mixture is smooth and homogeneous, mix again to ensure all ingredients are well incorporated.

  4. Cool down: Cover the bowl with plastic wrap and place it in the refrigerator. Let it sit for 2 to 3 hours until the glaze thickens to a creamy consistency, perfect for spreading over the cake.

Assembly Instructions

  1. Whip the cream: Using a mixer, whip the sweetened whipped cream until it reaches about 50% firmness, creating a soft, airy texture. Be careful not to overwhip at this stage.

  2. Sift the cocoa powder: Sift the cocoa powder once to remove any lumps, and gently fold it into the partially whipped cream.

  3. Adjust the consistency: If the cream becomes too stiff or dry while mixing, add a small amount of additional whipped cream little by little, folding gently until the desired consistency is reached—light and spreadable.

Layering the Cake

  1. Cut the cake: Take your cooled cake and carefully cut it horizontally into 3 to 4 even layers, depending on the height of your cake. Use a long serrated knife for an even cut.

  2. Spread the whipped cocoa cream: Place the first layer of cake on your serving plate. Spread a generous layer of whipped cocoa cream evenly over the surface, using a spatula to smooth it out. Repeat with each layer, stacking them gently on top of each other.

  3. Cover the entire cake: Use the remaining whipped cocoa cream to lightly coat the top layer of the cake. Then, spread a very thin layer of cream over the surface and sides of the entire cake for a smooth base.

Final Decoration and Softening the Cream

  1. Soften the refrigerated cream: If the cream has become too firm from refrigeration, take it out and stir it gently with a spatula to soften it until it is easily spreadable again.

  2. Roughly coat the cake: Apply the softened cream to the cake, spreading it in a rustic manner, especially on the sides, to create a "naked cake" effect. This doesn’t have to be perfect—roughly spreading it gives a charming homemade look.

  3. Enjoy the texture: This cake has a sticky and moist texture that makes it irresistible. It’s best to dive in and enjoy it without overthinking the presentation—just savor the rich, chocolatey goodness!

Rate this recipe:

Did you make this recipe?

Pin this recipe to share with your friends and followers.

pinit

Frequently Asked Questions

Expand All:
Can I use all-purpose flour instead of cake flour?

Yes, you can substitute all-purpose flour, but for the lightest texture, use ¾ cup of all-purpose flour and 2 tablespoons of cornstarch to replace 1 cup of cake flour.

What can I use instead of starch syrup?

Honey or light corn syrup works as an excellent alternative to starch syrup, maintaining the cake's moisture and sweetness.

Can I make this cake in advance?

Absolutely! You can bake the cake layers a day ahead and store them tightly wrapped at room temperature. Assemble and frost the cake on the day you plan to serve it for the freshest flavor.

How can I ensure my glaze is shiny and smooth?

Use high-quality chocolate and whisk the glaze well after melting to combine all the ingredients thoroughly. Refrigerate it for the recommended time, and if needed, stir it before spreading.

Can this cake be made gluten-free?

Yes, substitute the cake flour with a 1:1 gluten-free flour blend that’s designed for baking. Ensure all other ingredients, like cocoa powder and chocolate, are gluten-free certified.


Rate this recipe

Your email address will not be published. Required fields are marked *

Rate this recipe

Add a question

Your email address will not be published. Required fields are marked *

This error message is only visible to WordPress admins

Error: No feed found.

Please go to the Instagram Feed settings page to create a feed.