

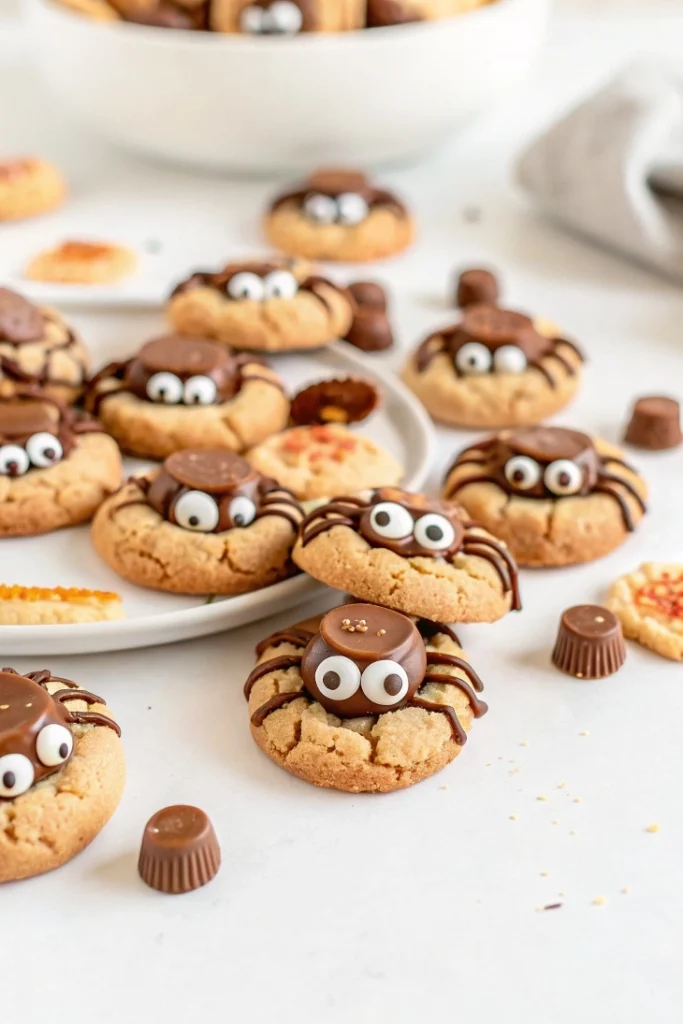
These Halloween Peanut Butter Spider Cookies are sure to win hearts for Halloween. They are as easy to make as they are delicious and such a perfectly spooky treat to serve! Bring them to a Halloween party or just share with your family.
Either way, you’re sure to create thrills and chills with these darling cookies.

❤️ Why You’ll Love This Recipe
- Spooky & Fun – The perfect treat for Halloween parties and celebrations.
- Easy to Make – Uses simple ingredients and a straightforward process.
- Delicious Peanut Butter Flavor – A classic, comforting peanut butter cookie base.
- Kid-Friendly – A fun project to decorate with children.
- Perfectly Portioned – Each cookie is topped with a mini Reese’s Peanut Butter Cup.
🛠 Tools You’ll Need
- Small mixing bowl
- Large mixing bowl
- Electric mixer or whisk
- Cookie sheet
- Microwave-safe bowl
- Squeeze bottle or decorating bag (for chocolate piping)
🥄 Key Ingredients
For the Cookies:
- All-purpose flour – The base for the cookies.
- Baking soda – For leavening.
- Salt – Balances sweetness.
- Butter – Softened, for richness 🧈
- White sugar – For sweetness and crisp edges, plus extra for rolling.
- Brown sugar – Adds moisture and a chewy texture.
- Peanut butter – The star flavor 🥜
- Egg – Binds ingredients.
- Vanilla extract – Enhances flavor.
For Decoration:
- Mini Reese’s Peanut Butter Cups – The “spider body.”
- Chocolate chips – For melting and piping the legs.
- Butter (1 tbsp) – Helps melt chocolate smoothly.
- Candy eyes – The essential spooky detail 👁️
🍪 How to Make Halloween Peanut Butter Spider Cookies
1. Preheat Oven & Mix Dry Ingredients:
Preheat oven to 350ºF (175°C). In a small bowl, whisk flour, baking soda, and salt.
2. Mix Wet Ingredients:
In a larger bowl, beat the butter, brown sugar, and white sugar together until smooth. Add peanut butter and mix again. Then add the egg and vanilla extract, mixing until fully combined.
3. Combine and Roll:
Stir in the flour mixture until just combined. Divide dough into 18 portions and roll into balls. Roll each ball in granulated sugar.
4. Bake:
Place the dough balls on a cookie sheet, spaced 2 inches apart. Bake for 10 minutes.
5. Create Indentation:
Immediately after baking, press an indentation in the center of each cookie for the mini Reese’s cup. Let cool completely.
6. Prepare Chocolate for Decorating:
Once cooled, melt chocolate chips with 1 tablespoon of butter in the microwave, stirring between 10-second intervals. Transfer to a squeeze bottle, piping bag, or zip-lock bag (snip a tiny corner).
7. Decorate:
Unwrap the mini Reese’s cups. Place a small dab of melted chocolate on the bottom of each cup and press it into the cookie’s indentation (top side down). Pipe 8 “legs” from the cup to the edges of the cookie and use chocolate to stick two candy eyes on each spider. Let set until firm.
💡 Tips for Success
- Don’t Overbake: Bake exactly 10 minutes for soft centers.
- Roll in Sugar: Adds texture and sparkle.
- Act Fast: Make the indentations while cookies are hot and pliable.
- Thin Legs: Cut a very small hole in the piping bag for realistic spider legs.
🆘 Cookie Troubleshooting Guide
Problem: Cookies spread too much.
Cause: Butter too soft or dough too warm.
Solution: Use slightly cool butter or chill dough 15–20 minutes before baking.
Problem: Spider legs too thick or messy.
Cause: Hole in piping tool is too large.
Solution: Use a smaller opening for neat, thin legs.
👩🍳 Pro Chef Tips
- Peanut Butter Choice: Use creamy peanut butter like Jif or Skippy (not natural).
- Make Ahead: Bake cookies ahead, decorate later.
- Variation: Try a Hershey’s Kiss for a fun twist on the spider body.
☕ Perfect Pairings
- Cold Milk: The classic combo for peanut butter cookies.
- Hot Chocolate: Warm, cozy, and rich.
- Apple Cider: Tart and festive for fall.
- Black Coffee: Cuts through sweetness beautifully.
📦 How to Store
- Room Temperature: Store decorated cookies in an airtight container for 3–5 days.
- Freezer: Freeze undecorated cookies for up to 3 months. Thaw before decorating.
🎃 More Spooky Halloween Recipes to Try 👻
- 🕷️ Spooky Red Velvet Spider Cookies Soft, Chewy & Perfect for Halloween Nights 🎃
- 🎃 Irresistible Halloween Witch Hat Cookies Peanut Butter & Chocolate Magic 🧙♀️
- 🎃Easy & Spooky Halloween Mummy Cookies 🍫👻
- 🎃 The Best Halloween Chocolate Chip Cookies 👻🍪

Get Recipes on Pinterest
🎃Easy Halloween Peanut Butter Spider Cookies 🕷️🥜
Description
These Halloween Peanut Butter Spider Cookies are fun, easy, and delicious! A soft peanut butter cookie topped with a mini Reese’s cup, chocolate legs, and candy eyes the perfect spooky-sweet Halloween treat.
Ingredients


Instructions
-
Preheat the oven to 350°F (175°C) and line a baking sheet with parchment paper.
-
In a small bowl, whisk together the flour, baking soda, and salt until well combined.
-
In a large mixing bowl, beat the butter, brown sugar, and white sugar until smooth and creamy. Add the peanut butter, then mix in the egg and vanilla extract until fully incorporated.
-
Stir in the dry ingredients just until the dough comes together — don’t overmix.
-
Divide the dough into 18 portions, roll each into a ball, and coat in granulated sugar. Place the dough balls on the prepared baking sheet, spacing them about 2 inches (5 cm) apart.
-
Bake in the center of the oven for 10 minutes, until the edges are lightly golden. Remove from the oven and immediately press a small indentation in the center of each cookie to hold the peanut butter cup later. Let the cookies cool completely on a wire rack.
To Decorate:
-
Meanwhile, place the chocolate chips and 1 tablespoon of butter in a microwave-safe bowl. Melt in 10-second intervals, stirring between each, until smooth and glossy.
-
Transfer the melted chocolate to a piping bag, squeeze bottle, or small zip-top bag with the corner snipped off.
-
Unwrap the peanut butter cups and place one upside down on each cookie, securing it with a small dab of melted chocolate.
-
Pipe eight chocolate “legs” from each peanut butter cup to the edges of the cookie, then use tiny dots of chocolate to attach two candy eyes on each spider.
-
Let the chocolate set before serving. You’ll end up with adorable, chewy Peanut Butter Spider Cookies sweet, spooky, and perfect for Halloween!
Note
For the best results, use frozen peanut butter cups. If they’re too warm, they’ll melt on the hot cookies and lose their shape, but they should still be soft enough to settle neatly into the indentation you’ve made in the center.
Parchment paper is ideal for baking these cookies, though a silicone baking mat (Silpat) works just as well.
If you don’t have a piping bag, place the melted chocolate for the spider legs in a small zip-top bag and snip a tiny hole in one corner to pipe the chocolate easily.
To make a larger batch, simply double or triple the ingredients using the adjustment options on the printable recipe card.