

Do you remember that sweet, enchanting scent of cotton candy at the fair? That magical moment when the spun sugar melted on your tongue, instantly taking you back to childhood?
For me, it’s a cherished memory, filled with laughter and vibrant colors. Today, I invite you to recreate that sweet escape with a recipe that will delight both young and old: our Cotton Candy Cake. Fluffy, pastel, and party-ready this cotton candy cake is the ultimate showstopper!
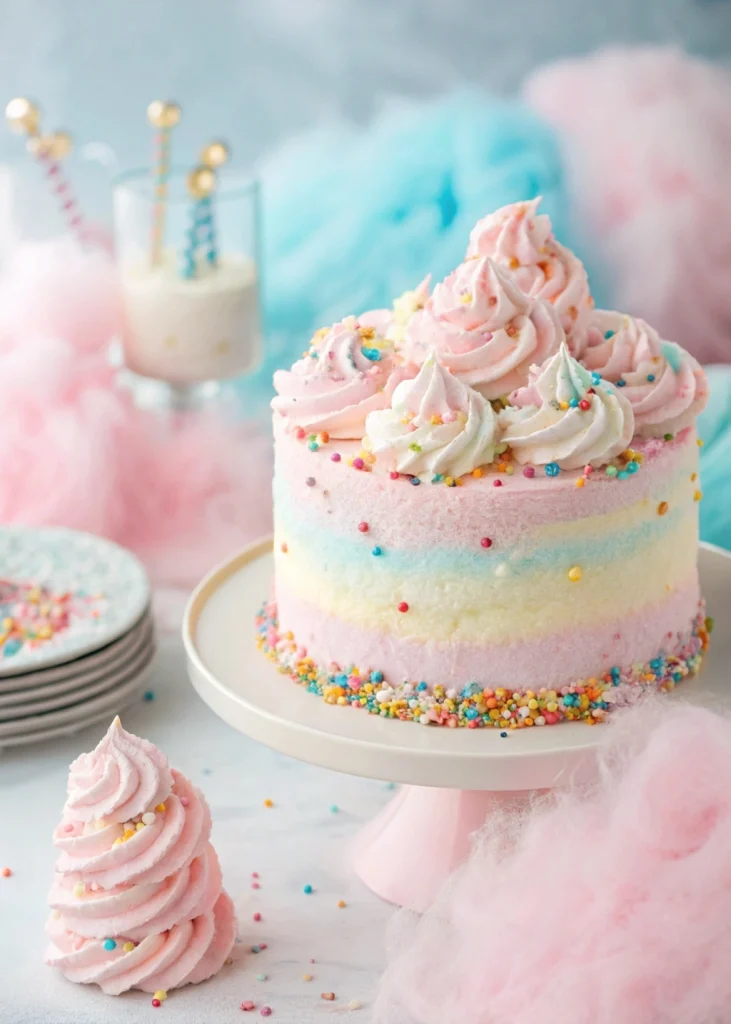
With tie-dye layers of pink and blue, dreamy cotton candy frosting, and a melt- n your mouth texture, it’s perfect for birthdays, baby showers, or gender reveals. Get ready to watch eyes light up!
🎉 What Makes This Cotton Candy Cake So Special?
✔ Tastes just like real cotton candy
✔ Swirled pastel colors inside and out
✔ Moist, buttery crumb with soft layers
✔ Dreamy frosting that pipes like a cloud
✔ Optional sprinkles + real cotton candy topping
🌟 Key Ingredients & Why They Matter
🍬 Lorann Cotton Candy Flavoring – The nostalgic magic in a bottle! This is what transforms a basic vanilla cake into a true cotton candy dream. A little goes a long way — trust it to deliver that iconic fairground flavor.
🧈 Unsalted Butter – Softened to room temp, this creates the creamiest texture in both cake and frosting. It adds richness without heaviness.
🍶 Buttermilk – This is the secret to that ultra-moist, tender crumb. It gives a slight tang that balances out the sweetness beautifully.
🥚 Eggs + Egg Whites – Using both whole eggs and extra whites makes the cake fluffy and light, like biting into a pastel cloud.
🎨 Gel Food Coloring – You’ll want that bold pink-and-blue swirl! Gel colors pop without thinning the batter. It’s how you get that dreamy tie-dye effect inside and out.
🍥 Heavy Cream (cold) – Essential for cloud-like frosting! Just a splash helps it whip up soft, smooth, and perfectly pipeable.
🧁 Cake Flour – Don’t skip this one. It’s lighter than all-purpose flour, which is key for a delicate, soft crumb.
✨ Optional: Edible Glitter or Sprinkle Medley – For that fairytale finish. Twinkle, sparkle, and a little extra “wow!”
🎀 Tips to Decorate Your Cotton Candy Cake Like a Pro
✅ Use gel food coloring for vibrant pastels
✅ Swirl batter by hand for the best marbled look
✅ Freeze between steps for clean layers
✅ Add cosmic sprinkles or edible glitter for extra sparkle
💌 The Ultimate Celebration Cake
This cotton candy cake isn’t just dessert it’s a celebration wrapped in pastel swirls and childhood wonder. With its cloud-soft crumb, dreamy frosting, and signature pink-and-blue layers, it brings pure joy to any occasion.
Whether you’re planning a birthday party, a gender reveal, or a whimsical baby shower, this cake steals the show and melts hearts 💗💙 One slice is all it takes to bring back the magic of the fair — sweet, nostalgic, and unforgettable.
❄️ How to Freeze and Store Your Cotton Candy Cak
🧊 To Store in the Fridge:
Wrap each frosted layer or the whole cake in plastic wrap or place in an airtight container. Refrigerate for up to 4 days. Before serving, let it sit at room temp for 20–30 minutes — the buttercream softens, flavors shine, and texture melts in your mouth.
🧁 To Freeze Cake Layers (Before Frosting):
Let your tie-dye sponge layers cool completely. Wrap each one tightly in plastic wrap, then in aluminum foil. Freeze for up to 1 month. When ready, thaw overnight in the fridge before stacking and decorating.
🎂 To Freeze Assembled (But Undecorated) Cake:
Frost a crumb coat and pop the cake uncovered in the freezer for 1 hour until firm. Then, wrap well and freeze for up to 2 weeks. Finish with your pastel swirls, sprinkles, and cotton candy toppings after thawing for that fresh, party-perfect look!
⚠️ Avoid Freezing Fully Decorated Cakes:
Especially ones with real cotton candy or piped colors — they don’t hold well. Cotton candy melts fast and color details may smudge after thawing.
💡 Pro Tip:
Label your frozen layers with date + flavor — perfect for prepping birthday magic ahead of time like a true pro 💗💙
Now slice it, snap a pic, and get ready for the compliments to roll in! 📸✨
🔗 Related Posts:
- 💗 Pink Velvet Cake Recipe: The Dreamiest Blush-Colored Dessert Ever 💕
- Ultimate Unicorn Cake Recipe: A Magical, Rainbow-Topped Dessert 🦄🍰
- 🍫 Mini Chocolate Lunchbox Cakes (With Cute Messages!) 🎀
🍬 Magical Cotton Candy Cake Recipe (Pink & Blue Magic!) 🎂
Description
Bring carnival magic to your kitchen with this cotton candy cake recipe! Made with pink and blue swirled layers, cotton candy flavoring, and the softest buttercream, it’s a dreamy centerpiece for parties, gender reveals, or any moment that calls for something fun, fluffy, and unforgettable.
Ingredients
🧁 Cake Ingredients


🍥 Cotton Candy Frosting
Instructions
🔪 Bake the Cake Layers
Prep your pans
-
Grease and line four 6-inch or three 8-inch pans with parchment. Preheat oven to 350°F / 175°C.
Mix wet ingredients
-
In a bowl, whisk together the whole egg, egg whites, and cotton candy flavoring. Set aside.
Blend dry ingredients
-
In a stand mixer: add flour, sugar, baking powder, and salt. Mix on low.
Add butter & buttermilk
-
Pour in butter and buttermilk. Beat on medium until light and fluffy (about 1–2 minutes). Scrape the bowl.
Incorporate egg mix
-
Slowly add the egg mixture in 2 rounds. Mix briefly after each until fully combined.
Color & swirl
-
Divide the batter in two. Tint half pink, half blue. Lightly swirl them in each pan to create a tie-dye effect.
Bake
-
Bake for 20–23 minutes. The cakes are done when a toothpick comes out clean.
Cool completely
-
Let cakes sit in pans for 10 minutes, then invert onto wire racks.
🧁 Make the Fluffiest Frosting
Whip the butter
-
Beat cold butter on medium for 3 minutes until pale and creamy.
Add sweetness
-
Slowly add sifted powdered sugar, then pour in cream, flavoring, and a pinch of salt.
Whip it good
-
Beat on high for 5 minutes until light and airy. Divide in two, tint pink and blue.
Smooth it out
-
Stir by hand at the end to eliminate air pockets.
🎂 Build Your Cotton Candy Cake
Trim the tops
-
Use a serrated knife to level each cake.
Stack the layers
-
Alternate cake and frosting — use ½ cup of frosting per layer (for 6") or 1 cup (for 8").
Crumb coat time
-
Spread a thin layer of frosting around the cake. Chill in the freezer for 10 minutes.
Final coat & decorate
-
Frost smoothly with remaining cream. Add swirls, sprinkles, or piped accents in both colors.
Add the cotton candy (last!)
-
Only decorate with real cotton candy right before serving — it melts quickly in the fridge!