

Easter is the kind of moment you remember through simple things. A table full of colors. A dessert that makes people smile before the first bite. This bunny cake does exactly that.
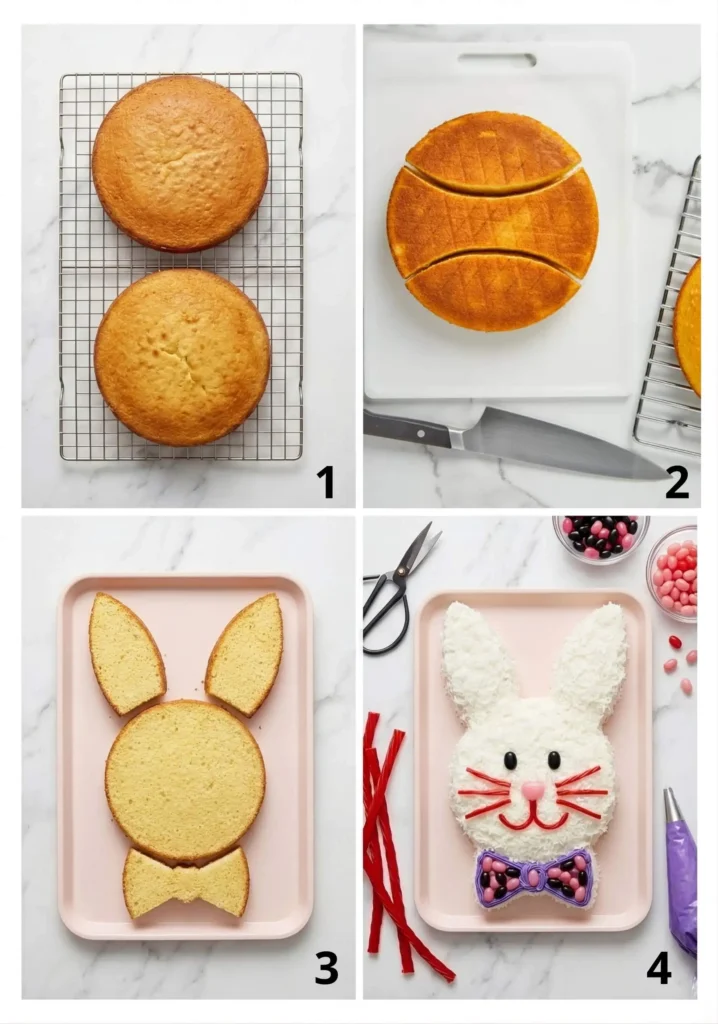
You start with two simple cakes. A few easy cuts turn them into a bunny shape. Then comes the fun part. Frosting, coconut, and colorful candies bring it to life. It looks special, yet it stays easy to make. Perfect to share, perfect to enjoy together.

❤️ Why You’ll Love This Recipe
- Surprisingly Simple – Two round cakes, a few clever cuts, and some fun decorating is all it takes to create a show-stopping Easter centerpiece 🐰
- No Fancy Skills Required – If you can bake a boxed cake mix and spread frosting, you can absolutely make this bunny cake. No sculpting expertise needed!
- Kid-Friendly Fun – Decorating with jellybeans, licorice whiskers, and coconut is the perfect activity to do with little ones during the holiday weekend 🎉
- Ready in Under 2 Hours – Prep, bake, cool, and decorate all in just 1 hour 25 minutes from start to finish ⏱️
- Crowd-Pleasing & Festive – The fluffy white coconut fur and colorful jellybean face make this cake an instant hit at any Easter table or party
- Easily Customizable – Use any cake flavor, swap coconut for sprinkles, or dye the coconut green for a grassy scene 🌿
🛠 Tools You’ll Need
- Two 9-inch metal springform pans 🍰
- Electric mixer (hand or stand) 🔌
- Large mixing bowl 🥣
- Serrated knife (for shaping the ears)
- Large serving tray or board
- Offset spatula or butter knife (for frosting)
- Wire cooling rack 🌬️
- Toothpick (for testing doneness)
🥄 Key Ingredients
For the Cake:
- Yellow cake mix (1 package, 15.25 oz) – A boxed mix makes this recipe fast and foolproof. Feel free to swap for strawberry, white, or funfetti cake mix for a fun twist 🎂
- Water (1 cup) – Hydrates the cake mix per package instructions
- Vegetable oil (⅓ cup) – Keeps the cake moist and tender 🌻
- Eggs (3 large) – Bind the batter and add structure and richness 🥚
For Frosting & Decoration:
- Vanilla frosting (1 container, 16 oz) – Store-bought makes this easy, but homemade vanilla buttercream or fluffy white frosting works beautifully too 🍦
- Flaked coconut (3¾ cups) – The fluffy white coconut coating gives the bunny its adorable fur texture. Toast lightly for a golden look, or dye green for a grassy effect 🥥
- Small jellybeans (30) – Used to decorate the bunny’s eyes, nose, bowtie spots, and face details with festive color 🌈
- Red licorice sticks (4 sticks) – Bent and placed on the face to create the bunny’s whimsical whiskers 🐭
🐰 How to Make the Easy Bunny Cake
- Preheat & Prep: Preheat oven to 350°F (175°C). Grease the sides and bottoms of two 9-inch springform pans thoroughly. 🔥
- Make the Batter: In a large bowl, beat the cake mix, water, vegetable oil, and eggs on low speed for 30 seconds until moistened. Increase to medium speed and beat for 2 full minutes until smooth. 🥣
- Bake: Divide batter evenly between the two prepared pans. Bake for 23–28 minutes, or until a toothpick inserted into the center comes out clean. ⏱️
- Cool: Let cakes cool in the pans for 15 minutes, then release from the springform pans and transfer to a wire rack to cool completely — about 20 more minutes. 🌬️
- Shape the Bunny: Place one whole round cake on your serving tray — this is the bunny’s head. From the second cake, cut two convex (outward curved) ear shapes from each side of the cake. Position them on either side of the head to form the ears. Place the remaining concave center piece about ½ inch below the head to form the bowtie. 🔪
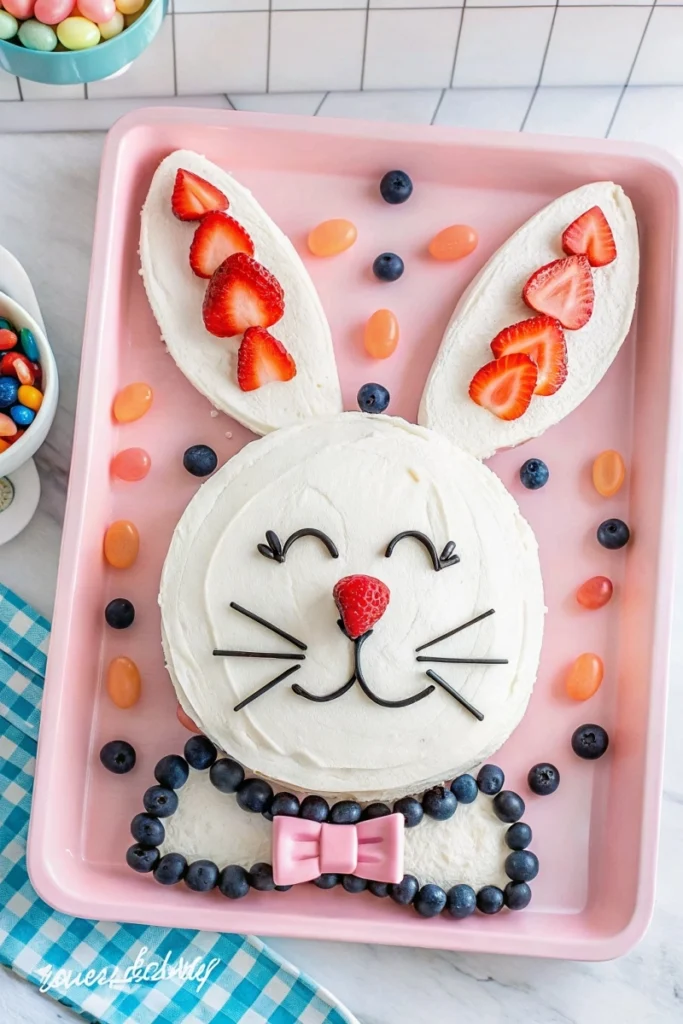
- Frost the Cake: Spread vanilla frosting evenly over the entire bunny — head, ears, and bowtie — covering all surfaces. ✨
- Add the Coconut Fur: Press flaked coconut generously all over the frosted surface, patting it gently to adhere to the top and sides until the entire bunny is covered in fluffy white fur. 🥥
- Decorate the Face: Use jellybeans to create the eyes, nose, and bowtie details. Bend and arrange red licorice sticks to form long, dramatic whiskers on each side of the face. 🐰
- Serve & Enjoy: Display your bunny cake proudly on the table and watch everyone’s faces light up!
💡 Tips for Success
- Cool Completely Before Decorating – A warm cake will melt the frosting and cause the coconut to slip off. Ensure the cakes are fully cooled to room temperature before any decorating begins.
- Use Springform Pans for Easy Release – The hinged sides of springform pans allow the round cakes to come out perfectly without breaking or sticking, which is critical for clean shaping.
- Shape Before Frosting – Cut and arrange all the cake pieces into the bunny shape first, then apply frosting. This prevents the cut surfaces from crumbling while you work.
- Pat the Coconut Firmly – Press the coconut into the frosting with your palm rather than just sprinkling it on. This ensures it sticks to the sides and won’t fall off when sliced.
- Color the Coconut for Grass – Mix a handful of coconut with 1–2 drops of green food coloring to create edible grass around the base of the bunny for an extra festive scene 🌿
🆘 Easy Bunny Cake Troubleshooting Guide
Problem: Cake layers domed too much and are uneven
- Likely Cause: Oven temperature too high or pans filled unevenly.
- Solution: Level the tops with a serrated knife once completely cooled before shaping. Even layers make cleaner ear cuts and a more stable bunny head.
Problem: Coconut won’t stick to the sides of the cake
- Likely Cause: Not enough frosting applied to the sides or coconut added too gently.
- Solution: Apply a slightly thicker layer of frosting on the sides. Hold cupped hands filled with coconut against each side and press firmly to adhere.
Problem: Ear pieces crumble and break when cutting
- Likely Cause: Cake not fully cooled before cutting, or cake too fragile.
- Solution: Always cut a fully cooled cake. Use a sharp serrated knife with a gentle sawing motion — not a pressing motion — to cut clean ear shapes.
Problem: Frosting tears the cake when spreading
- Likely Cause: Cake still slightly warm or frosting applied too forcefully.
- Solution: Let the cake cool fully. Apply a thin crumb coat first, refrigerate for 15 minutes to set it, then apply the final layer of frosting smoothly over the top.
Problem: Jellybeans and licorice slide off
- Likely Cause: Frosting already set and dry before decorating.
- Solution: Add all decorations immediately after the frosting is applied and before adding the coconut — or gently press them through the coconut into the still-moist frosting beneath.
👩🍳 Pro Chef Tips
- Flavored Cake Swap: Use strawberry cake mix for a pink-tinted cake, or funfetti mix for a colorful surprise inside — both look stunning under the white coconut fur 🍓
- Homemade Frosting Upgrade: Replace store-bought frosting with homemade Fluffy White Frosting or vanilla buttercream for a richer, more impressive finish
- Green Grass Scene: Use green food-colored coconut to create a surrounding “grass” patch around the bunny on the serving tray for an extra festive Easter meadow look 🌿
- Personalize the Face: Use pink jellybeans for the nose and inner ears, blue ones for the eyes, and yellow ones for the bowtie center for a classic Easter color palette 🌈
- Toasted Coconut Variation: Lightly toast some of the coconut before applying for a slightly golden, textured fur effect — beautiful for a more rustic look 🥥
☕ Perfect Pairings: What to Serve with Bunny Cake
- Easter Dessert Table: Alongside carrot cake cupcakes, birds nest cookies, and Easter dirt cake for a complete spring spread 🐣
- Easter Brunch: As the grand centerpiece dessert following a savory brunch of eggs Benedict, fresh fruit, and hot cross buns 🍊
- Kids’ Easter Party: Served with Easter-colored lemonade, pastel sugar cookies, and candy-filled cupcakes 🎉
- Family Dinner Finale: Brought to the table after Easter ham, roasted vegetables, and deviled eggs for the sweetest surprise finish 🥕
- Drinks: Cold milk for the kids, a light sparkling rosé for the adults, or a festive spring punch bowl 🌸
📦 How to Store
- Refrigerator: Due to its unique shape, the bunny cake is difficult to store whole. Place in an airtight storage container or cover loosely with plastic wrap and refrigerate for up to 2 days. ❄️
- Make-Ahead: Bake and shape the cakes 1–2 days ahead. Wrap and refrigerate unfrosted cakes. Frost and decorate the day of serving for the freshest appearance.
- Leftover Slices: Store individual slices in an airtight container in the refrigerator for up to 4–5 days.
- Freezer: Unfrosted cake layers can be frozen (wrapped tightly) for up to 2 months. Thaw overnight in the refrigerator before shaping, frosting, and decorating.
🎂 More Cakes You’ll Love
👉 💙 Bluey Cake Recipe: Easy & Adorable Pup-Tastic Treat!
👉 🍬 Magical Cotton Candy Cake Recipe (Pink & Blue Magic!) 🎂
👉 🍫 Mini Chocolate Lunchbox Cakes (With Cute Messages!) 🎀
👉 Ultimate Unicorn Cake Recipe: A Magical, Rainbow-Topped Dessert 🦄🍰

Get Recipes on Pinterest
Easy Bunny Cake Recipe, Cute Easter Bunny Cake with Coconut
Description
Two simple round yellow cakes cleverly cut and arranged into an adorable bunny head, covered in fluffy white coconut fur, and decorated with colorful jellybeans and licorice whiskers. The easiest, most festive Easter cake you'll ever make — and a guaranteed crowd-pleaser for kids and adults alike.
Ingredients
Cake


Frosting & Decoration:
Instructions
-
Prepare the pans and oven
Preheat the oven to 350°F, 175°C. Grease two 9-inch round pans well to avoid sticking.
-
Make the batter
In a large bowl, mix cake mix, water, oil, and eggs. Beat on low speed for 30 seconds, then on medium speed for 2 minutes until smooth.
-
Bake the cakes
Divide the batter evenly between the pans. Bake for 23 to 28 minutes until a toothpick inserted in the center comes out clean.
-
Cool completely
Let the cakes rest in the pans for 15 minutes. Remove and place on a wire rack. Let them cool fully before cutting.
-
Shape the bunny
Place one whole cake on your serving tray for the head. Cut the second cake into two ear shapes and one center piece. Place the ears on each side of the head. Place the center piece below to form the bowtie.
-
Frost the cake
Cover the entire bunny with an even layer of frosting. Spread gently to avoid tearing the cake.
-
Decorate and finish
Press coconut over all the frosted surface to create the fur. Add jellybeans for the face and bowtie. Place licorice for the whiskers. Serve once ready or chill slightly before serving.