

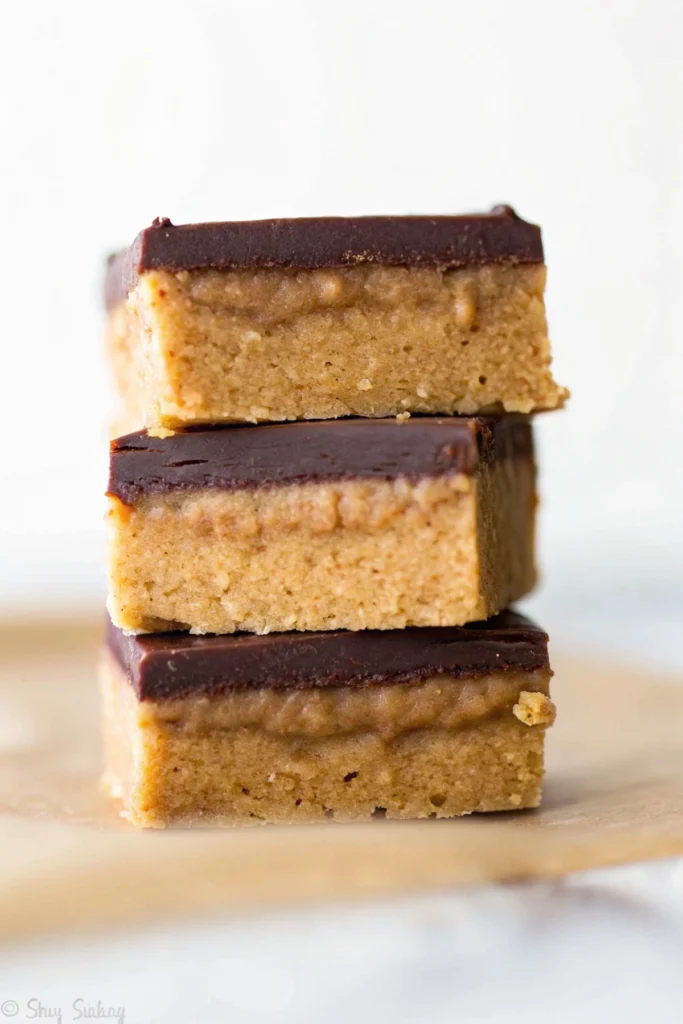
No-bake chocolate peanut butter bars are the ultimate easy dessert for chocolate and peanut butter lovers. Made with only 5 simple ingredients and requiring no oven time, this classic recipe delivers thick, rich layers with a creamy peanut butter base and a smooth chocolate topping.
Quick to prepare and perfect for make-ahead or freezer-friendly desserts, these bars taste just like the center of a peanut butter cup in every bite.

❤️ Why You’ll Love These Peanut Butter Bars
• Taste Like Peanut Butter Cups: The rich peanut butter layer combined with chocolate creates a flavor profile reminiscent of your favorite Reese’s candy.
• Only 5 Ingredients: A minimalist ingredient list makes this recipe accessible and budget-friendly.
• Quick to Make: With no baking required and minimal prep, these bars come together quickly and disappear even faster!
• Versatile Serving: Easily cut into large or small squares to suit any occasion or portion preference.
• Freeze Beautifully: These bars are highly freezer-friendly, making them perfect for make-ahead desserts or storing for later.
• No Oven Needed: Ideal for hot weather baking or when you simply don’t want to turn on the oven.
• Classic Flavor Combo: The timeless pairing of chocolate and peanut butter is always a crowd-pleaser.
🛠 Tools You’ll Need
• 8-inch or 9-inch Square Baking Pan (for forming the bars)
• Aluminum Foil or Parchment Paper (for easy lifting and cleanup)
• Medium Bowl (for mixing ingredients)
• Microwave-safe Bowl or Small Saucepan (for melting chocolate)
• Spatula (for mixing and spreading)
• Measuring cups and spoons
🥄 Key Ingredients
For the Peanut Butter Layer:
• Salted Butter – Melted, binds the base together (can use unsalted, add 1/4 tsp salt).
• Graham Cracker Crumbs – Provides structure and a delightful texture (can use gluten-free graham crackers).
• Confectioners’ Sugar (Powdered Sugar) – Adds sweetness and helps bind the mixture.
• Creamy Peanut Butter – The star of the show, used in both layers for rich flavor (processed creamy peanut butter like Skippy recommended for best texture).
For the Chocolate Topping:
• Semi-Sweet Chocolate Chips – For the velvety chocolate layer (can use other types of chocolate chips).
• Creamy Peanut Butter (remaining 2 Tbsp) – Helps create a smooth, spreadable chocolate topping.
🍫 How to Make No-Bake Chocolate Peanut Butter Bars
- Prepare Pan: Line an 8-inch or 9-inch square baking pan with aluminum foil or parchment paper, leaving an overhang on the sides for easy removal. Set aside.
- Make Peanut Butter Base: In a medium bowl, combine the melted butter, graham cracker crumbs, and confectioners’ sugar. Stir in 1 cup of creamy peanut butter until well combined. Press this mixture evenly into the prepared baking pan.
- Prepare Chocolate Topping: In a microwave-safe bowl or small saucepan, melt the remaining 2 tablespoons of peanut butter with the chocolate chips. Stir until smooth and fully combined.
- Assemble Bars: Pour the melted chocolate mixture evenly over the peanut butter layer in the pan. Spread gently to cover the entire surface.
- Chill & Set: Chill the bars in the refrigerator for at least 2 hours, or until completely firm. This is crucial for them to set properly.
- Cut & Serve: Once firm, use the foil/parchment overhang to lift the bars out of the pan. Allow them to sit at room temperature for about 10 minutes before cutting into squares. Serve chilled.
💡 Tips for Success
• Crucial Chilling Time: Do not rush the chilling process. The bars need at least 2 hours in the refrigerator to become firm enough to cut and hold their shape.
• Use Processed Creamy Peanut Butter: For the best texture and consistency, a processed creamy peanut butter (like Skippy or Jif) is recommended. Natural, oily peanut butters can alter the texture.
• Even Layers: Ensure both the peanut butter base and the chocolate topping are spread evenly for a beautiful presentation and consistent taste.
• Warm Knife for Cutting: For clean cuts, run a sharp knife under hot water, wipe it dry, and then slice the bars. Repeat as needed.
• Serving Temperature: These bars are best served chilled, but can sit at room temperature for a few hours without melting.
🆘 Troubleshooting Guide
Problem: Bars are too soft and don’t hold their shape.
• Likely Cause: Insufficient chilling time, or butter/peanut butter ratio is off.
• Solution: Ensure bars are chilled for at least 2 hours, or longer if your refrigerator is not very cold. Double-check ingredient measurements, especially butter.
Problem: Bars are oily.
• Likely Cause: Using natural, oily peanut butter, or butter was too warm.
• Solution: Use a processed creamy peanut butter. Ensure butter is melted but not excessively hot when mixed.
Problem: Chocolate topping is not setting properly.
• Likely Cause: Incorrect ratio of chocolate chips to peanut butter in the topping, or not enough chilling.
• Solution: Ensure the specified amount of chocolate chips and peanut butter is used for the topping. Allow for adequate chilling time.
Problem: Bars are difficult to cut cleanly.
• Likely Cause: Bars are too cold, or knife is not warm.
• Solution: Let the bars sit at room temperature for 10 minutes before cutting. Use a warm, dry knife for cleaner slices.
👩🍳 Pro Chef Tips
• Make Ahead: These bars are an excellent make-ahead dessert as they require chilling and can be stored for several days.
• Freezing: Freeze individual bars in an airtight container for up to 3 months. Thaw in the refrigerator or at room temperature before serving.
• Flavor Variations: Experiment with different types of chocolate chips (milk, dark, white) or add a sprinkle of flaky sea salt on top of the chocolate layer for a sweet and salty kick.
• Gifting: These bars make a delicious and impressive homemade gift for friends and family.
☕ Perfect Pairings: What to Enjoy with Your No-Bake Chocolate Peanut Butter Bars
• Cold Milk: A classic and refreshing accompaniment.
• Coffee: The bitterness of coffee complements the richness of the bars.
• Vanilla Ice Cream: A scoop of vanilla ice cream can add a delightful contrast in temperature and texture.
• Hot Chocolate: For an ultimate indulgent treat.
📦 How to Store
• Refrigerator: Store leftover bars tightly covered in an airtight container in the refrigerator for up to 1 week.
• Freezer: Freeze individual bars in an airtight, freezer-safe container or bag for up to 3 months.
📌 You’ll Also Love :
👉 How to Make Irresistible Red Velvet Cheesecake Brownies
👉 Easy Cheesecake Brownies with Swirls of Chocolate Bliss
👉 Snickerdoodle Cheesecake Bars: The Ultimate Triple Threat Dessert 🎉🍪🍰

Get Recipes on Pinterest
No-Bake Chocolate Peanut Butter Bars 🍫🥜 | Easy 5-Ingredient Dessert Recipe
Description
Decadent, easy-to-make no-bake bars with a rich peanut butter base and a smooth chocolate topping. Only 5 ingredients!
Ingredients
Peanut Butter Layer:

Chocolate Topping:
Instructions
-
Prepare the Pan
Line an 8-inch or 9-inch square baking pan with aluminum foil or parchment paper, making sure to leave excess hanging over the sides. This will allow you to lift the bars out easily once they are set. Set the pan aside.
-
Make the Peanut Butter Base
In a medium mixing bowl, add the melted butter, graham cracker crumbs, and confectioners’ sugar. Stir until the mixture is evenly combined. Add 1 cup of creamy peanut butter and mix thoroughly until the mixture becomes thick, smooth, and uniform.
-
Press the Base into the Pan
Transfer the peanut butter mixture into the prepared pan. Use a spatula or the back of a spoon to press it firmly and evenly across the bottom, creating a smooth, compact layer.
-
Prepare the Chocolate Topping
Place the chocolate chips and the remaining 2 tablespoons of peanut butter into a microwave-safe bowl or small saucepan. Heat gently (or microwave in short intervals), stirring frequently, until the chocolate is completely melted and the mixture is smooth and glossy.
-
Add the Chocolate Layer
Pour the melted chocolate mixture over the peanut butter base. Spread it evenly across the surface using a spatula, making sure the entire base is fully covered.
-
Chill Until Firm
Place the pan in the refrigerator and chill for at least 2 hours, or until the bars are fully set and firm to the touch.
-
Slice and Serve
Once set, lift the bars out of the pan using the foil or parchment overhang. Let them sit at room temperature for about 10 minutes to slightly soften, then cut into squares. Serve chilled.
Note
1️⃣ Freezing Instructions ❄️
- These bars freeze beautifully for up to 3 months.
- Wrap the bars tightly, either as a whole slab or cut into individual squares.
- For easy storage, place the squares in a freezer-safe container, layering parchment paper between them.
- When ready to serve, thaw overnight in the refrigerator for the best texture and flavor.
2️⃣ Recommended Tools 🛠️
To make prep simple and mess-free, you’ll need:
- 8-inch or 9-inch square baking pan
- Glass mixing bowls
- Rubber spatula for smooth mixing and spreading
3️⃣ Butter Options 🧈
- This recipe works best with salted butter, but unsalted butter can be used instead.
- If using unsalted butter, add ¼ teaspoon salt when mixing the peanut butter to balance the sweetness.
4️⃣ Peanut Butter Tips 🥜
- For the creamiest texture, use a processed creamy peanut butter (like Jif or Skippy).
- Natural or oily peanut butter is not recommended, as it can cause the bars to separate or become greasy.
- Chunky peanut butter can be used, but keep in mind the bars may turn out slightly more crumbly.
5️⃣ Graham Cracker Substitution 🍪
- No graham crackers where you live? No problem!
- Substitute with 120 g (about 8 biscuits) of ground digestive biscuits for a similar flavor and texture.
6️⃣ Recipe Update ✨
- This recipe was updated in 2019 with increased amounts of confectioners’ sugar and peanut butter.
- The result? Thicker, richer, and more indulgent bars that hold their shape beautifully 😍