

Step into the Halloween spirit with these Red Velvet Spider Cookies a hauntingly beautiful twist on a classic favorite. Soft, chewy, and rich with velvety chocolate flavor, each cookie is crowned with playful chocolate chip spiders and delicate icing webs.
They’re not just cookies, they’re little edible works of art the kind that bring smiles, a touch of fright, and a whole lot of sweetness to your Halloween table. Perfect for parties, kids, or anyone who loves a good mix of spooky and cozy.

❤️ Why You’ll Love This Recipe
- Spooky & Festive – Perfectly themed with spider web and spider decorations.
- Rich Red Velvet Flavor – Deep chocolate taste and classic red color.
- Chewy & Soft Texture – A mix of cake and all-purpose flour for a soft bite.
- Easy to Decorate – Simple icing tubes make decorating fun and effortless.
🛠 Tools You’ll Need
- Stand mixer with paddle attachment
- Large and medium mixing bowls
- Whisk
- 3-ounce cookie scoop
- 2 baking sheets
- Silicone baking mats or parchment paper
- 3 cookie icing tubes (black, white, red) with small tips
- Wire rack
🥄 Key Ingredients
For the Cookies:
- Unsalted butter – Cubed, for easier creaming 🧈
- Granulated sugar – Sweetness base
- Large eggs – Room temperature
- Pure vanilla extract – Flavor depth
- Red food coloring – Signature red velvet look
- Unsweetened cocoa powder – Chocolate flavor
- Baking soda & Cornstarch – Structure and softness
- Kosher salt – Balances flavor
- Cake flour & All-purpose flour – Creates a chewy yet tender cookie
- Semi-sweet chocolate chips – For the spiders’ bodies 🍫
For Decoration:
- Black cookie icing – Spider legs & web outlines
- White cookie icing – Spider webs
- Red cookie icing – Black widow hourglass
🍪 How to Make Red Velvet Spider Cookies
1. Cream Butter and Sugar:
In a large mixing bowl, use a stand mixer to cream cubed butter and sugar for 90 seconds (30 sec low, 30 sec medium, 30 sec high) until light and fluffy.
2. Add Wet Ingredients:
Add eggs one at a time, mixing thoroughly. Add vanilla, cocoa powder, and red food coloring. Mix on low until fully combined.
3. Combine Dry Ingredients:
Whisk together cake flour, all-purpose flour, baking soda, cornstarch, and salt in a separate bowl.
4. Form Dough:
Gradually add dry mixture to wet ingredients on low speed until a soft dough forms. Mix in chocolate chips, reserving 20 for spider decorations.
5. Chill Dough:
Refrigerate the dough (uncovered) for 20 minutes.
6. Scoop and Prepare for Baking:
Preheat oven to 410°F (210°C). Line baking sheets. Scoop 3-ounce dough portions (about 6 oz total per cookie). Roll into tall balls.
7. Bake:
Press 4 chocolate chips on top of each dough ball for spider bodies. Bake 9–11 minutes. Cookies should look gooey in the center.
8. Cool:
Cool cookies on the sheet for 30 minutes before transferring to a wire rack.
9. Decorate Spiders:
Pipe black icing for spider legs around the chocolate chips. Add a red hourglass shape on the center of each spider for a black widow effect.
10. Decorate Webs:
Use white icing to draw spider webs on the cookie edges. Let icing set before serving.
💡 Tips for Success
- Room Temperature Eggs: Create a lighter, fluffier cookie.
- Don’t Overbake: Cookies will set as they cool.
- Use Both Flours: Key for chewy red velvet texture.
- Chill Time: Prevents excess spreading and maintains shape.
🆘 Cookie Troubleshooting Guide
Problem: Cookies spread too much.
Cause: Butter too warm or dough under-chilled.
Fix: Chill dough for full 20 minutes; ensure butter is not greasy.
Problem: Color not vibrant.
Cause: Low-quality or insufficient food coloring.
Fix: Use concentrated gel food coloring for deep red results.
Problem: Icing too soft or runny.
Cause: Applied too thickly or humidity.
Fix: Pipe thinner lines and let icing harden in a cool, dry place.
👩🍳 Pro Chef Tips
- Bake One Sheet at a Time: For consistent oven temperature.
- Black Widow Variation: Add candy eyes for a cuter spider look.
- Make Ahead: Bake a day ahead, decorate before serving.
☕ Perfect Pairings
- Cold Milk: Balances the rich red velvet flavor.
- Hot Chocolate: Doubles down on the chocolatey goodness.
- Coffee: Cuts through sweetness beautifully.
- Vanilla Ice Cream: Serve warm cookies with a scoop of vanilla for a decadent dessert.
📦 How to Store
- Room Temperature: Airtight container, up to 3–5 days.
- Freezer: Freeze baked cookies up to 3 months. Thaw before serving.
🎃 More Spooky Halloween Recipes to Try 👻
- 🎃 Irresistible Halloween Witch Hat Cookies Peanut Butter & Chocolate Magic 🧙♀️
- 🎃Easy Halloween Peanut Butter Spider Cookies 🕷️🥜
- 🎃Easy & Spooky Halloween Mummy Cookies 🍫👻
- 🎃 The Best Halloween Chocolate Chip Cookies 👻🍪

Get Recipes on Pinterest
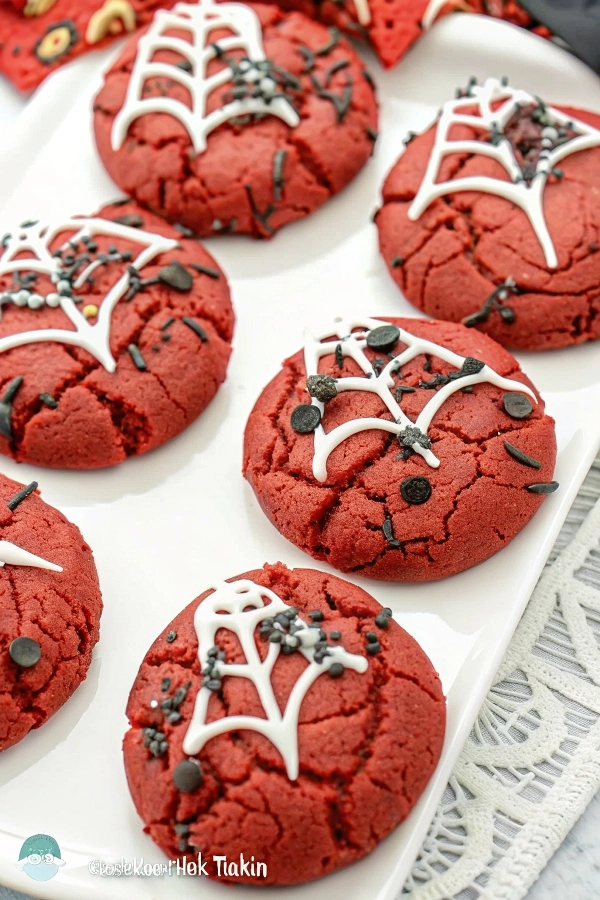
🕷️ Spooky Red Velvet Spider Cookies Soft, Chewy & Perfect for Halloween Nights 🎃
Description
These Red Velvet Halloween Spider Cookies are the perfect spooky treat chewy red velvet cookies decorated with spider webs and chocolate chip spiders! The rich chocolate flavor and vibrant red hue make them both delicious and eye-catching for your Halloween dessert spread.
Ingredients


Instructions
-
In a large mixing bowl, combine butter and sugar. Using the paddle attachment of a stand mixer, cream together on low speed for 30 seconds, medium speed for another 30 seconds, and high speed for 30 more seconds. The mixture should look pale and fluffy.
-
Mix in one egg at a time until fully combined. Stir in the vanilla extract. Then add cocoa powder and red food coloring, mixing on low until evenly blended.
-
In a separate bowl, whisk together cake flour, all-purpose flour, baking soda, cornstarch, and salt.
-
Gradually add the dry ingredients to the wet mixture on low speed. Mix until a soft dough forms. Gently fold in chocolate chips, reserving about 40 chips for spider decorations.
-
Place the dough in the refrigerator (uncovered) for about 20 minutes.
-
Preheat the oven to 410°F (210°C). Line two baking sheets with silicone mats or parchment paper. Scoop out 6-ounce portions of dough (use two 3-ounce scoops per cookie) and shape them into tall dough balls.
-
Arrange the dough balls on the baking sheets, about four per row, staggered slightly. Press 4–5 chocolate chips on top of each cookie for the spider bodies.
-
Bake one tray at a time for 9–11 minutes. The cookies should appear soft and gooey in the center when done. Remove from oven and let cool on the tray for 30 minutes before transferring to a wire rack.
-
Use black icing to pipe spider legs around the chocolate chips.
-
Add a red hourglass on each spider’s body with red icing for a black widow look.
-
Draw white spider webs extending from the cookie edges using white icing.
-
Allow icing to harden completely before serving or storing.