

Nothing says “home” quite like a bubbling cherry pie with a golden lattice crust. 🍒 Wrapped in a buttery, flaky shell and overflowing with sweet, jammy cherries, this homemade cherry pie is pure comfort in every bite. Whether it’s summer picnic season, a cozy Sunday dinner, or just a moment to treat yourself, you need this pie in your life. 🥄💕
💖 Why You’ll Fall in Love with This Cherry Pie
- 🍒 Packed with juicy, sweet cherries
- 🧈 Buttery, flaky homemade crust
- ❄️ Works with fresh or frozen cherries
- 📸 Stunning lattice top = Pinterest-worthy!
- 👩🍳 Beginner-friendly with pro results
- 🍨 Pairs perfectly with ice cream or whipped cream
🧰 Tools You’ll Need
- 9” deep pie dish
- Rolling pin
- Cherry pitter (trust us, it’s worth it!)
- Large mixing bowl
- Saucepan
- Pastry brush
- Pizza cutter or sharp knife
- Cooling rack
🛒 Key Ingredients & Why They Matter
🍒 Cherries – Sweet or tart, fresh or frozen. They bake into a rich, syrupy filling.
🍋 Lemon Juice – Balances sweetness and brightens flavor.
🧂 Cornstarch – Thickens the filling so it’s saucy, not runny.
🧈 Butter – A few dots of butter = rich, glossy pie magic.
🥧 Pie Crust – Homemade or store-bought, you’ll need a bottom + top.
🥚 Egg + Milk – For that glossy, golden-brown crust finish.
✨ Coarse Sugar – Sprinkled on top for sparkle and crunch!
👩🍳 How to Make Cherry Pie (Step-by-Step)
🔹 Step 1: Make & Chill the Dough
Make your pie crust (or use store-bought) and chill for at least 1 hour. This keeps the crust flaky.
🔹 Step 2: Prep the Cherry Filling
In a large bowl, mix together:
- 6 cups pitted sweet cherries
- 1 Tbsp lemon juice
- ¾ cup sugar (1 cup if using sour cherries)
- 5 Tbsp cornstarch
- ½ tsp ground cinnamon
Let sit for 5–10 minutes until the cherries look saucy.
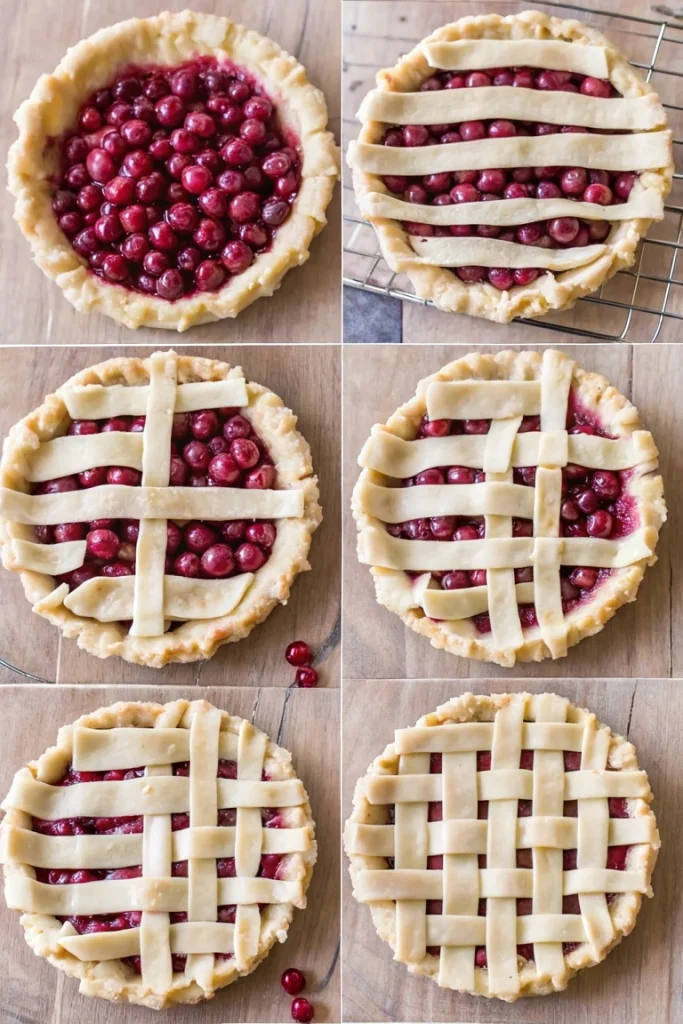
🔹 Step 3: Assemble the Pie
- Roll one dough disk into a 13″ circle.
- Place in your 9″ deep-dish pie plate. Let the edges hang over.
- Pour in the cherry filling (include all the juice!).
- Dot the top with 1 Tbsp diced butter.
🔹 Step 4: Create the Lattice Top
- Roll out the second disk into a 12″ circle.
- Slice into ten 1-inch strips.
- Weave a lattice top (over/under method).
- Tuck in edges and crimp with your fingers.
🔹 Step 5: Chill Before Baking
Place the whole pie in the fridge for 30 minutes or freeze for 15. This helps prevent soggy bottoms!
🔹 Step 6: Bake the Pie
- Brush crust with an egg wash (1 egg + 1 Tbsp milk or water).
- Sprinkle with coarse sugar.
- Bake at 425°F (220°C) for 25 minutes on the lower third rack.
- Reduce temp to 350°F (175°C) and bake 35–40 minutes more.
- It’s ready when juices bubble through the lattice for at least 5 minutes (important to activate the cornstarch).
🔹 Step 7: Cool & Serve
Let the pie cool completely to allow the filling to set. Slice and serve with ice cream, whipped cream, or enjoy as-is! 🍒✨
Cool completely before slicing (yes, it’s hard to wait—but it’s worth it!).
💡 Gemma’s Pro Pie Tips
❄️ Always chill your assembled pie before baking.
🍒 Use a mix of fresh and frozen cherries for bold flavor.
🔥 Bake on the lower third oven rack to avoid burning the top.
🧼 Slide foil underneath to catch drips and save cleanup.
🥄 Don’t cut too soon! Let it cool completely so the filling holds.
🧊 How to Store Cherry Pie
❄️ Fridge – Store leftovers tightly wrapped for up to 4 days.
🧊 Freezer – Freeze the baked pie (wrapped in foil + plastic) for up to 3 months. Thaw overnight in the fridge before serving.
📌 More Recipes You’ll Love
Red Velvet Whoopie Pies : Soft, Creamy & Irresistible🎂✨
Warning: This Nutella Cookie Pie Might Go Viral 📸🍪
🍮 2-Minute Dulce de Leche Mousse – The Easiest Dessert Ever!

Get Recipes on Pinterest
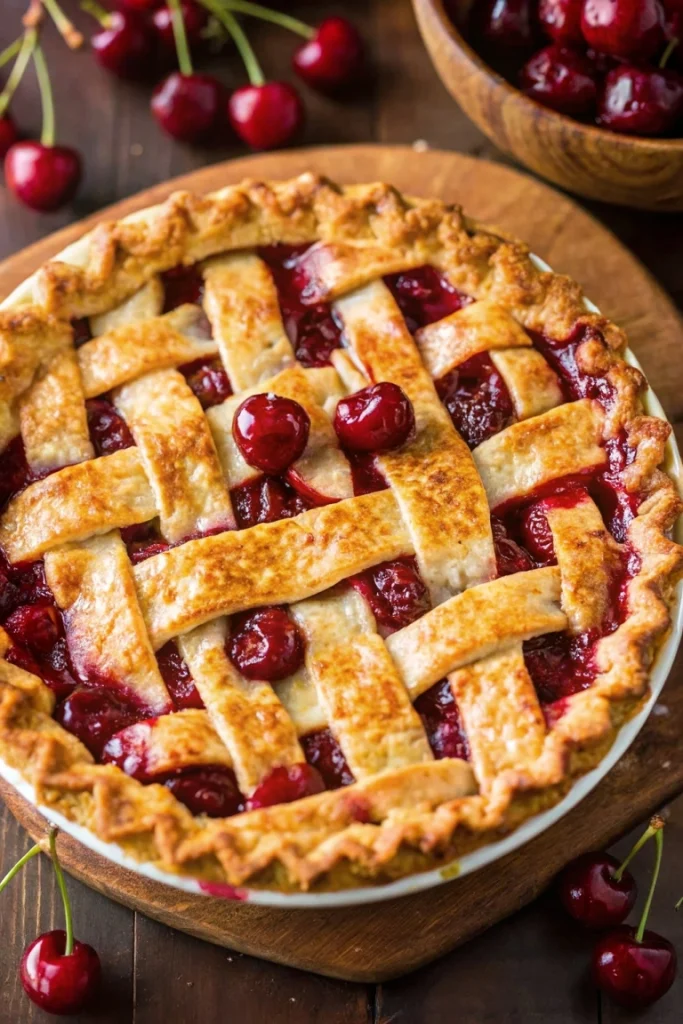
🍒 Homemade Cherry Pie: The Juicy, Flaky Summer Showstopper! 🥧✨
Description
This homemade cherry pie is a timeless dessert made with a buttery double crust and filled with sweet, jammy cherries. Whether using fresh or frozen fruit, this pie bakes to perfection with a bubbling filling and crisp lattice top. It’s easy to make, incredibly delicious, and ideal for picnics, holidays, or a cozy Sunday treat. Serve warm with vanilla ice cream for the ultimate cherry pie experience!
Ingredients


Instructions
-
Chill pie dough 1 hour. Preheat oven to 425°F (220°C).
-
In a bowl, mix cherries, lemon juice, sugar, cornstarch, and cinnamon. Let sit 10 min.
-
Roll out one crust and line a 9" pie dish. Fill with cherry mixture. Dot with butter.
-
Roll out second crust, slice into strips, and weave a lattice. Crimp edges.
-
Chill assembled pie 30 min (or freeze 15).
-
Brush with egg wash. Sprinkle with sugar.
-
Bake 25 min at 425°F, then 35–40 min at 350°F, until golden and bubbly.
-
Cool fully before slicing. Enjoy with ice cream!